我们开始来研究 bean 完整生命周期的 BeanDefinition
阶段了,这一阶段主要发生了以下几件事情:
解析配置文件、配置类并封装为 BeanDefinition
。
1. 加载xml配置文件
来,跟着小册来到 LifecycleSourceXmlApplication
的测试代码:
复制 public static void main( String [] args) throws Exception {
ClassPathXmlApplicationContext ctx = new ClassPathXmlApplicationContext() ;
ctx . setConfigLocation ( "lifecycle/bean-source.xml" );
}
1.1 保存配置文件路径
这里 xml 配置文件的加载会使用 ClassPathXmlApplicationContext
的 setConfigLocation
方法,点进去可以发现它只是在 AbstractRefreshableConfigApplicationContext
中,给 configLocations
设置了配置文件的路径存放而已。
通过源码,也能看出来最终是将传入的路径切分,并顺序存入 configLocations
中:
复制 public void setConfigLocation( String location) {
// 切分配置文件路径
setConfigLocations( StringUtils . tokenizeToStringArray(location , CONFIG_LOCATION_DELIMITERS)) ;
}
public void setConfigLocations(@ Nullable String ... locations ) {
if (locations != null ) {
// assert ......
this . configLocations = new String [ locations . length ];
for ( int i = 0 ; i < locations . length ; i ++ ) {
// 存入ApplicationContext中
this . configLocations [i] = resolvePath(locations[i]) . trim ();
}
}
else {
this . configLocations = null ;
}
}
Debug 时,也能发现,它最终把测试代码中设置的 xml 配置文件的路径都保存了。
1.2 加载配置文件并解析
当执行 ApplicationContext
的 refresh
方法后,会开始刷新(初始化)IOC 容器,这里面有 13 个步骤,前面已经看过不少次了:
复制 public void refresh() throws BeansException , IllegalStateException {
synchronized ( this . startupShutdownMonitor ) {
prepareRefresh() ;
// 2. 初始化BeanFactory
ConfigurableListableBeanFactory beanFactory = obtainFreshBeanFactory() ;
prepareBeanFactory(beanFactory) ;
// ......
}
}
这里面我把第 2 步 obtainFreshBeanFactory
方法标注出来了,加载配置文件并解析的动作就在这里面,我们可以来研究一下。
复制 protected ConfigurableListableBeanFactory obtainFreshBeanFactory() {
refreshBeanFactory() ;
return getBeanFactory() ;
}
这个方法只有两个动作:刷新 BeanFactory
,然后获取它。毫无疑问,刷新的动作中包含配置文件的加载和解析 ,我们继续往里看。
refreshBeanFactory
方法是 AbstractApplicationContext
定义的抽象方法,很明显这里又是模板方法模式 的体现了。由于当前我们正在研究的是基于 xml 配置文件的 ApplicationContext
,所以要进入 AbstractRefreshableApplicationContext
中:
复制 protected final void refreshBeanFactory() throws BeansException {
// 存在BeanFactory则先销毁
if ( hasBeanFactory() ) {
destroyBeans() ;
closeBeanFactory() ;
}
try {
// 创建BeanFactory
DefaultListableBeanFactory beanFactory = createBeanFactory() ;
beanFactory . setSerializationId ( getId() );
customizeBeanFactory(beanFactory) ;
// 【1.3】加载配置文件
loadBeanDefinitions(beanFactory) ;
this . beanFactory = beanFactory;
} // catch ......
}
看一下源码的大体流程,在前面 15 章中我们已经了解到,基于 xml 配置文件的 **ApplicationContext**
可以反复刷新加载 IOC 容器 ,所以此处有已经存在的判断:如果当前 ApplicationContext
中组合的 BeanFactory
已经存在,则销毁原来的 BeanFactory
,并重新创建。
关注重点,这里面加载配置文件的动作是 loadBeanDefinitions
。这个方法相当复杂且困难,小册会选取最重要的部分来解析。
1.3 loadBeanDefinitions
点进去,发现 loadBeanDefinitions
又是一个抽象方法,在 AbstractXmlApplicationContext
中可以找到对应的实现:
复制 protected void loadBeanDefinitions( DefaultListableBeanFactory beanFactory) throws BeansException , IOException {
// xml配置文件由XmlBeanDefinitionReader解析
XmlBeanDefinitionReader beanDefinitionReader = new XmlBeanDefinitionReader(beanFactory) ;
// 配置上下文环境、资源加载器等
beanDefinitionReader . setEnvironment ( this . getEnvironment ());
beanDefinitionReader . setResourceLoader ( this );
beanDefinitionReader . setEntityResolver ( new ResourceEntityResolver( this ) );
initBeanDefinitionReader(beanDefinitionReader) ;
// 使用xml解析器 解析xml配置文件
loadBeanDefinitions(beanDefinitionReader) ;
}
注意这里面,它创建了一个 XmlBeanDefinitionReader
,小伙伴们一定不陌生吧,它在第 14 章就出现过,我们说它就是加载和解析 xml 配置文件的核心 API 。直接看最底下吧,它把这个 XmlBeanDefinitionReader
作为参数传入重载的 loadBeanDefinitions
方法:
复制 protected void loadBeanDefinitions( XmlBeanDefinitionReader reader) throws BeansException , IOException {
Resource [] configResources = getConfigResources() ;
if (configResources != null ) {
reader . loadBeanDefinitions (configResources);
}
String [] configLocations = getConfigLocations() ;
if (configLocations != null ) {
// 【1.4】加载配置文件资源路径的xml配置文件
reader . loadBeanDefinitions (configLocations);
}
}
注意这段逻辑分两部分,一个是处理已经加载好的现成的 Resource
,一个是处理指定好的配置文件资源路径。由于测试代码中并没有直接指定 Resource ,故此处主要研究第 8 行的 loadBeanDefinitions(configLocations)
。
Debug 至此处,同样也能发现 reader
与 configLocations
都准备好了:
1.4 XmlBeanDefinitionReader加载配置文件
复制 public int loadBeanDefinitions( String ... locations ) throws BeanDefinitionStoreException {
// assert ......
int count = 0 ;
for ( String location : locations) {
count += loadBeanDefinitions(location) ;
}
return count;
}
点进来,发现它传入的是一组配置文件,那自然就会循环一个个的加载咯。循环自然不是重点,我们进入内部的 loadBeanDefinitions(location)
中:
复制 public int loadBeanDefinitions( String location) throws BeanDefinitionStoreException {
return loadBeanDefinitions(location , null ) ;
}
public int loadBeanDefinitions(String location, @Nullable Set<Resource> actualResources) throws BeanDefinitionStoreException {
ResourceLoader resourceLoader = getResourceLoader() ;
if (resourceLoader == null ) {
// throw ex ......
}
if (resourceLoader instanceof ResourcePatternResolver) {
try {
// 根据传入的路径规则,匹配所有符合的xml配置文件
Resource [] resources = ((ResourcePatternResolver) resourceLoader) . getResources (location);
int count = loadBeanDefinitions(resources) ;
if (actualResources != null ) {
Collections . addAll (actualResources , resources);
}
// logger ......
return count;
} // catch ......
}
else {
// 每次只能解析一个xml配置文件
Resource resource = resourceLoader . getResource (location);
// 【解析】
int count = loadBeanDefinitions(resource) ;
if (actualResources != null ) {
actualResources . add (resource);
}
// logger ......
return count;
}
}
可以发现,这里的核心逻辑只有两个动作:1) 根据传入的资源路径,获取 xml 配置文件 ;2) 解析 xml 配置文件 。其余的动作都是保证程序正常执行的代码,咱就不研究了,还是核心关注 loadBeanDefinitions
的方法实现。
复制 public int loadBeanDefinitions( Resource resource) throws BeanDefinitionStoreException {
return loadBeanDefinitions( new EncodedResource(resource)) ;
}
这一步给原有的 xml 配置文件的 Resource
封装包装了一层编码而已,没啥需要关注的,继续往里看。
复制 public int loadBeanDefinitions( EncodedResource encodedResource) throws BeanDefinitionStoreException {
// assert logger ......
Set < EncodedResource > currentResources = this . resourcesCurrentlyBeingLoaded . get ();
if ( ! currentResources . add (encodedResource)) {
// throw ex ......
}
try ( InputStream inputStream = encodedResource . getResource () . getInputStream ()) {
InputSource inputSource = new InputSource(inputStream) ;
if ( encodedResource . getEncoding () != null ) {
inputSource . setEncoding ( encodedResource . getEncoding ());
}
// 【真正干活的】
return doLoadBeanDefinitions(inputSource , encodedResource . getResource()) ;
} // catch ......
finally {
currentResources . remove (encodedResource);
if ( currentResources . isEmpty ()) {
this . resourcesCurrentlyBeingLoaded . remove ();
}
}
}
方法逻辑看上去很复杂,但是抛开细枝末节,最核心的动作还是那个以 do 开头的 doLoadBeanDefinitions
,它才是真正干活的,所以看它就完事了。
1.5 doLoadBeanDefinitions - 读取配置文件
复制 protected int doLoadBeanDefinitions( InputSource inputSource , Resource resource)
throws BeanDefinitionStoreException {
try {
Document doc = doLoadDocument(inputSource , resource) ;
int count = registerBeanDefinitions(doc , resource) ;
// logger ......
return count;
} // catch ......
}
一上来又是一个 do 开头的方法,得了,我就看你。。。诶等一下,doLoadDocument
这很明显是解析文档吧,这我们也没必要看吧(也看不懂),重点是下面的那句 registerBeanDefinitions
,这才是我们最关心的吧!
复制 public int registerBeanDefinitions( Document doc , Resource resource) throws BeanDefinitionStoreException {
BeanDefinitionDocumentReader documentReader = createBeanDefinitionDocumentReader() ;
int countBefore = getRegistry() . getBeanDefinitionCount ();
// 【解析】
documentReader . registerBeanDefinitions (doc , createReaderContext(resource) );
return getRegistry() . getBeanDefinitionCount () - countBefore;
}
注意,此处构造了一个 DefaultBeanDefinitionDocumentReader
,然后调用它的 registerBeanDefinitions
方法(不再是 XmlBeanDefinitionReader
的方法了):
复制 public void registerBeanDefinitions( Document doc , XmlReaderContext readerContext) {
this . readerContext = readerContext;
doRegisterBeanDefinitions( doc . getDocumentElement()) ;
}
又又又是这个套路!xxx 方法最终调 doXxx 方法干活 ,得了那咱继续往里走:
复制 protected void doRegisterBeanDefinitions( Element root) {
BeanDefinitionParserDelegate parent = this . delegate ;
this . delegate = createDelegate(getReaderContext() , root , parent) ;
if ( this . delegate . isDefaultNamespace (root)) {
// 取<beans>上的profile属性
String profileSpec = root . getAttribute (PROFILE_ATTRIBUTE);
if ( StringUtils . hasText (profileSpec)) {
String [] specifiedProfiles = StringUtils . tokenizeToStringArray (
profileSpec , BeanDefinitionParserDelegate . MULTI_VALUE_ATTRIBUTE_DELIMITERS );
if ( ! getReaderContext() . getEnvironment () . acceptsProfiles (specifiedProfiles)) {
// logger ......
return ;
}
}
}
preProcessXml(root) ;
// 【解析xml】
parseBeanDefinitions(root , this . delegate ) ;
postProcessXml(root) ;
this . delegate = parent;
}
注意看这段源码,上面它会先把 xml 配置文件中声明的 profile 取出来,并根据 Environment
中配置好的 profile 决定是否继续解析( profile 的过滤).
接下来,后面就是 xml 配置文件的解析动作了,在这前后有一个预处理和后处理动作,不过默认情况下这里是没有实现的(模板方法罢了),所以我们只需要看 parseBeanDefinitions
就可以。
1.6 parseBeanDefinitions - 解析xml
复制 protected void parseBeanDefinitions( Element root , BeanDefinitionParserDelegate delegate) {
if ( delegate . isDefaultNamespace (root)) {
NodeList nl = root . getChildNodes ();
for ( int i = 0 ; i < nl . getLength (); i ++ ) {
Node node = nl . item (i);
if (node instanceof Element) {
Element ele = (Element) node;
// 解析<beans>中的元素
if ( delegate . isDefaultNamespace (ele)) {
parseDefaultElement(ele , delegate) ;
}
else {
// 解析其它命名空间中的元素
delegate . parseCustomElement (ele);
}
}
}
}
else {
delegate . parseCustomElement (root);
}
}
Spring 如何解析 xml ,我们不关心,但是如何从解析完的 xml 中获取关键信息,以及封装 **BeanDefinition**
,这才是我们要关注的。
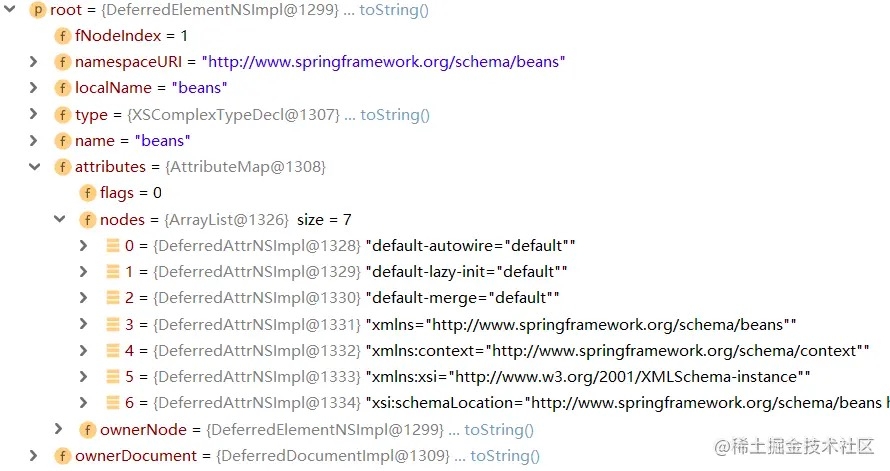
这个方法一进来的时候,我们在此 Debug 停一下,可以发现它已经是解析并封装成 Element
的形式了,而且根节点是 <beans>
,它还有几个默认属性等等,我们都比较熟悉了:
OK ,继续回到源码,源码中可以看到,每次循环出来的 Node
都会尝试着转成 Element
去解析,而解析的动作主要是 parseDefaultElement
,它会解析 <beans>
标签下的 xml 元素。马上就要水落石出了,我们点进去看:
复制 private void parseDefaultElement( Element ele , BeanDefinitionParserDelegate delegate) {
if ( delegate . nodeNameEquals (ele , IMPORT_ELEMENT)) {
importBeanDefinitionResource(ele) ;
}
else if ( delegate . nodeNameEquals (ele , ALIAS_ELEMENT)) {
processAliasRegistration(ele) ;
}
else if ( delegate . nodeNameEquals (ele , BEAN_ELEMENT)) {
processBeanDefinition(ele , delegate) ;
}
else if ( delegate . nodeNameEquals (ele , NESTED_BEANS_ELEMENT)) {
// recurse
doRegisterBeanDefinitions(ele) ;
}
}
终于看到真实的面貌了!!!这里它会解析 <import>
标签、<alias>
标签、<bean>
标签,以及递归解析嵌套的 <beans>
标签!
1.7 processBeanDefinition - 解析 <bean>
标签
既然我们还是在研究 BeanDefinition
,那我们就研究 processBeanDefinition
方法啦,翻开源码,可以发现逻辑还是比较简单的:
复制 protected void processBeanDefinition( Element ele , BeanDefinitionParserDelegate delegate) {
// 解析xml元素为BeanDefinition
BeanDefinitionHolder bdHolder = delegate . parseBeanDefinitionElement (ele);
if (bdHolder != null ) {
// 解析<bean>中嵌套的自定义标签
bdHolder = delegate . decorateBeanDefinitionIfRequired (ele , bdHolder);
try {
// BeanDefinition注册到BeanDefinitionRegistry
BeanDefinitionReaderUtils . registerBeanDefinition (bdHolder , getReaderContext() . getRegistry ());
} // catch ......
// Send registration event.
getReaderContext() . fireComponentRegistered ( new BeanComponentDefinition(bdHolder) );
}
}
可以发现,整个动作一气呵成,其中第一个步骤会把 xml 元素封装为 BeanDefinitionHolder
,且不说 holder 是干嘛用,只从名字上就能知道,它内部肯定组合了一个 BeanDefinition
。
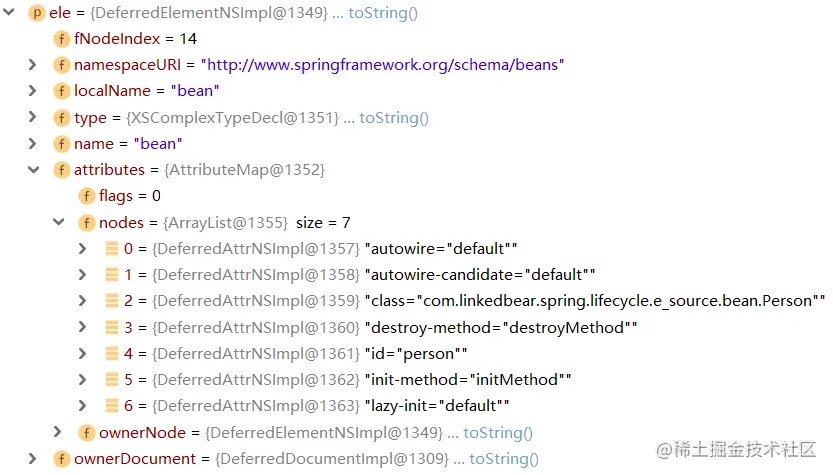
Debug 至此,可以发现,这个 Element
中已经包含了一个 <bean>
标签中定义的那些属性了:
不过源码是如何将 xml 元素封装为 BeanDefinitionHolder
的呢?我们还是进去看看为好。
复制 public BeanDefinitionHolder parseBeanDefinitionElement( Element ele) {
return parseBeanDefinitionElement(ele , null ) ;
}
public BeanDefinitionHolder parseBeanDefinitionElement( Element ele , @ Nullable BeanDefinition containingBean) {
// 取出bean的id
String id = ele . getAttribute (ID_ATTRIBUTE);
// 取出bean的name
String nameAttr = ele . getAttribute (NAME_ATTRIBUTE);
// 取出bean的alias
List < String > aliases = new ArrayList <>();
if ( StringUtils . hasLength (nameAttr)) {
String [] nameArr = StringUtils . tokenizeToStringArray (nameAttr , MULTI_VALUE_ATTRIBUTE_DELIMITERS);
aliases . addAll ( Arrays . asList (nameArr));
}
// 如果没有给bean赋name,则第一个alias视为name
String beanName = id;
if ( ! StringUtils . hasText (beanName) && ! aliases . isEmpty ()) {
beanName = aliases . remove ( 0 );
// logger ......
}
// 检查bean的name是否有重复
if (containingBean == null ) {
checkNameUniqueness(beanName , aliases , ele) ;
}
// 解析其余的bean标签元素属性
AbstractBeanDefinition beanDefinition = parseBeanDefinitionElement(ele , beanName , containingBean) ;
if (beanDefinition != null ) {
// 如果没有给bean赋name,且没有alias,则生成默认的name
if ( ! StringUtils . hasText (beanName)) {
try {
if (containingBean != null ) {
beanName = BeanDefinitionReaderUtils . generateBeanName (
beanDefinition , this . readerContext . getRegistry () , true );
} else {
beanName = this . readerContext . generateBeanName (beanDefinition);
String beanClassName = beanDefinition . getBeanClassName ();
if (beanClassName != null &&
beanName . startsWith (beanClassName) && beanName . length () > beanClassName . length () &&
! this . readerContext . getRegistry () . isBeanNameInUse (beanClassName)) {
aliases . add (beanClassName);
}
}
// logger ......
} // catch ......
}
String [] aliasesArray = StringUtils . toStringArray (aliases);
return new BeanDefinitionHolder(beanDefinition , beanName , aliasesArray) ;
}
return null ;
}
虽说源码篇幅比较长,但总体还是比较容易理解和接受的,而且每一步干的活也都容易看明白。不过看完这段源码之后,小伙伴们可能会疑惑:只有 id
和 name
,class
呢?scope
呢?lazy-init
呢?莫慌,看到中间还有一个封装好的 parseBeanDefinitionElement
方法了吧,这些属性的封装都在这里可以找得到,我们继续往里进。同样的,这段源码篇幅较长,只需要关注带注释的即可:
复制 public AbstractBeanDefinition parseBeanDefinitionElement(
Element ele , String beanName , @ Nullable BeanDefinition containingBean) {
this . parseState . push ( new BeanEntry(beanName) );
// 解析class的全限定名
String className = null ;
if ( ele . hasAttribute (CLASS_ATTRIBUTE)) {
className = ele . getAttribute (CLASS_ATTRIBUTE) . trim ();
}
// 解析parent的definition名称
String parent = null ;
if ( ele . hasAttribute (PARENT_ATTRIBUTE)) {
parent = ele . getAttribute (PARENT_ATTRIBUTE);
}
try {
// 构造BeanDefinition
AbstractBeanDefinition bd = createBeanDefinition(className , parent) ;
// 解析其余的<bean>标签属性
parseBeanDefinitionAttributes(ele , beanName , containingBean , bd) ;
bd . setDescription ( DomUtils . getChildElementValueByTagName (ele , DESCRIPTION_ELEMENT));
// 解析property属性
parseMetaElements(ele , bd) ;
// 解析其它的属性 ......
bd . setResource ( this . readerContext . getResource ());
bd . setSource ( extractSource(ele) );
return bd;
} // catch finally ......
return null ;
}
从这部分,我们终于看到了最最底层的操作:调用 createBeanDefinition
方法创建了一个 BeanDefinition
(它的底层就是第 24 章提到的 BeanDefinitionReaderUtils.createBeanDefinition
方法),之后把 <bean>
标签中的其它属性、<bean>
的子标签的内容都封装起来,而封装 <bean>
其它属性的 parseBeanDefinitionAttributes
方法中,已经把这些内容都解析到位了:
复制 public AbstractBeanDefinition parseBeanDefinitionAttributes( Element ele , String beanName ,
@ Nullable BeanDefinition containingBean , AbstractBeanDefinition bd) {
// 解析scope
if ( ele . hasAttribute (SINGLETON_ATTRIBUTE)) {
error( "Old 1.x 'singleton' attribute in use - upgrade to 'scope' declaration" , ele) ;
} else if ( ele . hasAttribute (SCOPE_ATTRIBUTE)) {
bd . setScope ( ele . getAttribute (SCOPE_ATTRIBUTE));
} else if (containingBean != null ) {
// Take default from containing bean in case of an inner bean definition.
bd . setScope ( containingBean . getScope ());
}
// 解析abstract属性
if ( ele . hasAttribute (ABSTRACT_ATTRIBUTE)) {
bd . setAbstract ( TRUE_VALUE . equals ( ele . getAttribute (ABSTRACT_ATTRIBUTE)));
}
// 省略部分相似的封装属性的动作 ......
return bd;
}
到这里,xml 配置文件中的 <bean>
标签就可以转换为 BeanDefinition
了。
1.7.1 BeanDefinitionHolder的意义
最后补充一下前面略过的 BeanDefinitionHolder
,我们说它是持有 BeanDefinition
的一个包装而已,不过它除了持有之外,还包含了另外的重要信息:bean 的名称 。
翻看 BeanDefinitionHolder
的源码结构,可以发现这里面还组合了 bean 的 name 和 alias :
复制 public class BeanDefinitionHolder implements BeanMetadataElement {
private final BeanDefinition beanDefinition;
private final String beanName;
@ Nullable
private final String [] aliases;
}
是不是突然回过神了,BeanDefinition
的结构中是没有 name 的!所以才需要这样一个 holder 帮它持有。
1.8 小结
简单总结一下这个流程吧:首先 **ClassPathXmlApplicationContext**
在 **refresh**
之前,会指定传入的 xml 配置文件的路径,执行 **refresh**
方法时,会初始化 **BeanFactory**
,触发 xml 配置文件的读取、加载和解析。其中 xml 的读取需要借助 **XmlBeanDefinitionReader**
,解析 xml 配置文件则使用 **DefaultBeanDefinitionDocumentReader**
,最终解析 xml 中的元素,封装出 **BeanDefinition**
,最后注册到 **BeanDefinitionRegistry**
。
2. 加载注解配置类
相比较于 xml 配置文件,注解配置类的加载时机会晚一些,它用到了一个至关重要的 BeanDefinitionRegistryPostProcessor
,而且无论如何,这个后置处理器都是最最优先执行的,它就是 **ConfigurationClassPostProcessor**
。
下面我们还是通过实例来研究注解配置类的加载机制(注意此处要换用 LifecycleSourceAnnotationApplication
了哦)。
2.1 BeanDefinitionRegistryPostProcessor的调用时机
还是回到 AbstractApplicationContext
的 refresh
方法中,这次我们要看的是 BeanFactoryPostProcessor
和 BeanDefinitionRegistryPostProcessor
的执行时机,而它们的执行都在下面所示的第 5 步 invokeBeanFactoryPostProcessors
中执行:
复制 public void refresh() throws BeansException , IllegalStateException {
synchronized ( this . startupShutdownMonitor ) {
// ......
try {
postProcessBeanFactory(beanFactory) ;
// 5. 执行BeanFactoryPostProcessor
invokeBeanFactoryPostProcessors(beanFactory) ;
registerBeanPostProcessors(beanFactory) ;
// ......
}
// catch finally .....
}
}
进来这个方法,发现核心的方法就一句话:
复制 protected void invokeBeanFactoryPostProcessors( ConfigurableListableBeanFactory beanFactory) {
// 交给代理执行
PostProcessorRegistrationDelegate . invokeBeanFactoryPostProcessors (beanFactory , getBeanFactoryPostProcessors() );
// 下面是支持AOP的部分(暂时不读)
}
好吧,它又是交给一个 Delegate 执行,那就进去看这个方法的实现吧。
2.2 PostProcessorRegistrationDelegate的实现
前方高能 !invokeBeanFactoryPostProcessors
方法的篇幅实在太长了!!!小册只截取关键的部分吧。
复制 public static void invokeBeanFactoryPostProcessors(
ConfigurableListableBeanFactory beanFactory , List< BeanFactoryPostProcessor > beanFactoryPostProcessors) {
Set < String > processedBeans = new HashSet <>();
if (beanFactory instanceof BeanDefinitionRegistry) {
BeanDefinitionRegistry registry = (BeanDefinitionRegistry) beanFactory;
List < BeanFactoryPostProcessor > regularPostProcessors = new ArrayList <>();
List < BeanDefinitionRegistryPostProcessor > registryProcessors = new ArrayList <>();
// 该部分会将BeanFactoryPostProcessor与BeanDefinitionRegistryPostProcessor分离开
for ( BeanFactoryPostProcessor postProcessor : beanFactoryPostProcessors) {
if (postProcessor instanceof BeanDefinitionRegistryPostProcessor) {
BeanDefinitionRegistryPostProcessor registryProcessor =
(BeanDefinitionRegistryPostProcessor) postProcessor;
registryProcessor . postProcessBeanDefinitionRegistry (registry);
registryProcessors . add (registryProcessor);
}
else {
regularPostProcessors . add (postProcessor);
}
}
List < BeanDefinitionRegistryPostProcessor > currentRegistryProcessors = new ArrayList <>();
// 首先,执行实现了PriorityOrdered接口的BeanDefinitionRegistryPostProcessors
String [] postProcessorNames =
beanFactory . getBeanNamesForType ( BeanDefinitionRegistryPostProcessor . class , true , false );
for ( String ppName : postProcessorNames) {
if ( beanFactory . isTypeMatch (ppName , PriorityOrdered . class )) {
currentRegistryProcessors . add ( beanFactory . getBean (ppName , BeanDefinitionRegistryPostProcessor . class ));
processedBeans . add (ppName);
}
}
sortPostProcessors(currentRegistryProcessors , beanFactory) ;
registryProcessors . addAll (currentRegistryProcessors);
invokeBeanDefinitionRegistryPostProcessors(currentRegistryProcessors , registry) ;
currentRegistryProcessors . clear ();
// 接下来,执行实现了Ordered接口的BeanDefinitionRegistryPostProcessors
postProcessorNames = beanFactory . getBeanNamesForType ( BeanDefinitionRegistryPostProcessor . class , true , false );
for ( String ppName : postProcessorNames) {
if ( ! processedBeans . contains (ppName) && beanFactory . isTypeMatch (ppName , Ordered . class )) {
currentRegistryProcessors . add ( beanFactory . getBean (ppName , BeanDefinitionRegistryPostProcessor . class ));
processedBeans . add (ppName);
}
}
sortPostProcessors(currentRegistryProcessors , beanFactory) ;
registryProcessors . addAll (currentRegistryProcessors);
invokeBeanDefinitionRegistryPostProcessors(currentRegistryProcessors , registry) ;
currentRegistryProcessors . clear ();
// 最后,执行所有其他BeanDefinitionRegistryPostProcessor
boolean reiterate = true ;
while (reiterate) {
reiterate = false ;
postProcessorNames = beanFactory.getBeanNamesForType(BeanDefinitionRegistryPostProcessor.class, true, false);
for ( String ppName : postProcessorNames) {
if ( ! processedBeans . contains (ppName)) {
currentRegistryProcessors.add(beanFactory.getBean(ppName, BeanDefinitionRegistryPostProcessor.class));
processedBeans . add (ppName);
reiterate = true ;
}
}
sortPostProcessors(currentRegistryProcessors , beanFactory) ;
registryProcessors . addAll (currentRegistryProcessors);
invokeBeanDefinitionRegistryPostProcessors(currentRegistryProcessors , registry) ;
currentRegistryProcessors . clear ();
}
invokeBeanFactoryPostProcessors(registryProcessors , beanFactory) ;
invokeBeanFactoryPostProcessors(regularPostProcessors , beanFactory) ;
}
else {
invokeBeanFactoryPostProcessors(beanFactoryPostProcessors , beanFactory) ;
}
// 执行BeanFactoryPostProcessor ......
}
用简单的语言概括,这个方法的执行机制如下:
执行 BeanDefinitionRegistryPostProcessor
的 postProcessBeanDefinitionRegistry
方法
执行实现了 PriorityOrdered
接口的 BeanDefinitionRegistryPostProcessor
执行实现了 Ordered
接口的 BeanDefinitionRegistryPostProcessor
执行普通的 BeanDefinitionRegistryPostProcessor
执行 BeanDefinitionRegistryPostProcessor
的 postProcessBeanFactory
方法 同上
执行BeanFactoryPostProcessor
的 postProcessBeanFactory
方法 同上
这个方法的更详细解读,可参考《SpringBoot 小册》第 12 章 5.1 节 ,那里面解释的更加详细呦。
在这个长长的方法中,第一个环节它会执行所有实现了 PriorityOrdered
接口的 BeanDefinitionRegistryPostProcessor
,这里面第一个执行的处理器就是 ConfigurationClassPostProcessor
,咱跟过去看一看。
2.3 ConfigurationClassPostProcessor的处理
直接定位到 postProcessBeanDefinitionRegistry
方法吧:
复制 public void postProcessBeanDefinitionRegistry( BeanDefinitionRegistry registry) {
int registryId = System . identityHashCode (registry);
// check throw ex ......
this . registriesPostProcessed . add (registryId);
// 【解析配置类】
processConfigBeanDefinitions(registry) ;
}
可以发现,在这个方法的最后一行,就是解析配置类中定义的 bean ,并封装为 BeanDefinition
。
进入超难领域前的 “按摩” 提醒:processConfigBeanDefinitions
方法的内容超级复杂哦(不亚于上面的 xml 配置文件加载),考虑到前面的 SpringBoot 小册中对该部分流程没有全部剖析 ( boot 的小册 中对于 IOC 更注重整体应用和容器的生命周期 ),所以我们在这里完整的研究一遍配置类的加载原理 。
进入 processConfigBeanDefinitions
方法,来吧,超级长的源码又出现了:
复制 public void processConfigBeanDefinitions( BeanDefinitionRegistry registry) {
List < BeanDefinitionHolder > configCandidates = new ArrayList <>();
String [] candidateNames = registry . getBeanDefinitionNames ();
// 筛选出所有的配置类
for ( String beanName : candidateNames) {
BeanDefinition beanDef = registry . getBeanDefinition (beanName);
// full configuration的解释可参考boot小册12章5.2.1.1节
if ( ConfigurationClassUtils . isFullConfigurationClass (beanDef) ||
ConfigurationClassUtils . isLiteConfigurationClass (beanDef)) {
// logger ......
} else if ( ConfigurationClassUtils . checkConfigurationClassCandidate (beanDef , this . metadataReaderFactory )) {
configCandidates . add ( new BeanDefinitionHolder(beanDef , beanName) );
}
}
// Return immediately if no @Configuration classes were found
if ( configCandidates . isEmpty ()) {
return ;
}
// 配置类排序
configCandidates . sort ((bd1 , bd2) -> {
int i1 = ConfigurationClassUtils . getOrder ( bd1 . getBeanDefinition ());
int i2 = ConfigurationClassUtils . getOrder ( bd2 . getBeanDefinition ());
return Integer . compare (i1 , i2);
});
// 构造默认的BeanNameGenerator bean的名称生成器
SingletonBeanRegistry sbr = null ;
if (registry instanceof SingletonBeanRegistry) {
sbr = (SingletonBeanRegistry) registry;
if ( ! this . localBeanNameGeneratorSet ) {
BeanNameGenerator generator = (BeanNameGenerator) sbr . getSingleton (CONFIGURATION_BEAN_NAME_GENERATOR);
if (generator != null ) {
this . componentScanBeanNameGenerator = generator;
this . importBeanNameGenerator = generator;
}
}
}
if ( this . environment == null ) {
this . environment = new StandardEnvironment() ;
}
// 真正解析配置类的组件:ConfigurationClassParser
ConfigurationClassParser parser = new ConfigurationClassParser(
this . metadataReaderFactory , this . problemReporter , this . environment ,
this . resourceLoader , this . componentScanBeanNameGenerator , registry) ;
Set < BeanDefinitionHolder > candidates = new LinkedHashSet <>(configCandidates);
Set < ConfigurationClass > alreadyParsed = new HashSet <>( configCandidates . size ());
do {
// 【解析配置类】
parser . parse (candidates);
parser . validate ();
Set < ConfigurationClass > configClasses = new LinkedHashSet <>( parser . getConfigurationClasses ());
configClasses . removeAll (alreadyParsed);
if ( this . reader == null ) {
this . reader = new ConfigurationClassBeanDefinitionReader(
registry , this . sourceExtractor , this . resourceLoader , this . environment ,
this . importBeanNameGenerator , parser . getImportRegistry()) ;
}
// 【加载配置类的内容】
this . reader . loadBeanDefinitions (configClasses);
alreadyParsed . addAll (configClasses);
// 一些额外的处理动作
}
while ( ! candidates . isEmpty ());
// 一些额外的处理 ......
}
其实如果小伙伴从上往下看的话,应该可以意识到,其实也没那么难吧(当然没那么难,难的在 parse
和 loadBeanDefinitions
里头)。不过这里面的前置动作还是要注意一下,它初始化了一个 ConfigurationClassParser
,这个家伙是用来解析注解配置类的核心 API 。
一大堆前戏都做足了,下面就可以进入 ConfigurationClassParser
的 parse
方法了。
2.4 ConfigurationClassParser#parse - 解析注解配置类
复制 public void parse( Set< BeanDefinitionHolder > configCandidates) {
for ( BeanDefinitionHolder holder : configCandidates) {
BeanDefinition bd = holder . getBeanDefinition ();
try {
// 注解配置类
if (bd instanceof AnnotatedBeanDefinition) {
parse(((AnnotatedBeanDefinition) bd) . getMetadata() , holder . getBeanName()) ;
}
// 编程式注入配置类
else if (bd instanceof AbstractBeanDefinition && ((AbstractBeanDefinition) bd) . hasBeanClass ()) {
parse(((AbstractBeanDefinition) bd) . getBeanClass() , holder . getBeanName()) ;
}
// 其他情况
else {
parse( bd . getBeanClassName() , holder . getBeanName()) ;
}
} // catch ......
}
// 回调特殊的ImportSelector
this . deferredImportSelectorHandler . process ();
}
先整体看一下这个方法的内容哈。上面的 for 循环中,它会把配置类的全限定名拿出来,扔进重载的 parse
方法中(注意无论是执行 if-else-if 的哪个分支,最终都是执行重载的 parse
方法);for 循环调用完成后,最底下会让 deferredImportSelectorHandler
执行 process
方法,这个东西我们完全没见过,这里有必要说明一下。
2.4.1 ImportSelector的扩展
在 SpringFramework 4.0 中,ImportSelector
多了一个子接口:DeferredImportSelector
,它的执行时机比 ImportSelector
更晚,它会在注解配置类的所有解析工作完成后才执行(其实上面的源码就已经解释了这个原理)。
一般情况下,DeferredImportSelector
会跟 @Conditional
注解配合使用,完成条件装配 。
2.4.2 deferredImportSelectorHandler的处理逻辑
进入 DeferredImportSelectorHandler
的 process
方法:
复制 public void process() {
List < DeferredImportSelectorHolder > deferredImports = this . deferredImportSelectors ;
this . deferredImportSelectors = null ;
try {
if (deferredImports != null ) {
DeferredImportSelectorGroupingHandler handler = new DeferredImportSelectorGroupingHandler() ;
deferredImports . sort (DEFERRED_IMPORT_COMPARATOR);
deferredImports . forEach (handler :: register);
handler . processGroupImports ();
}
}
finally {
this . deferredImportSelectors = new ArrayList <>();
}
}
可以发现这个处理逻辑还是很简单的,它会取出所有解析中存储好的 DeferredImportSelector
,并依次执行。由于 DeferredImportSelector
的执行时机比较晚,对于 @Conditional
条件装配的处理也会更有利,所以这个设计还是不错的。
2.5 parse解析配置类
回到正题上,上面的 ConfigurationClassParser
中最终都会把配置类传入重载的 parse
方法中,参数类型注意是 ConfigurationClass
:
复制 protected final void parse( AnnotationMetadata metadata , String beanName) throws IOException {
processConfigurationClass( new ConfigurationClass(metadata , beanName)) ;
}
protected void processConfigurationClass( ConfigurationClass configClass) throws IOException {
if ( this . conditionEvaluator . shouldSkip ( configClass . getMetadata () , ConfigurationPhase . PARSE_CONFIGURATION )) {
return ;
}
ConfigurationClass existingClass = this . configurationClasses . get (configClass);
if (existingClass != null ) {
// 如果配置类已经被@Import过了,则跳过
if ( configClass . isImported ()) {
if ( existingClass . isImported ()) {
existingClass . mergeImportedBy (configClass);
}
return ;
}
else {
this . configurationClasses . remove (configClass);
this . knownSuperclasses . values () . removeIf (configClass :: equals);
}
}
SourceClass sourceClass = asSourceClass(configClass) ;
do {
// 【真正干活的】
sourceClass = doProcessConfigurationClass(configClass , sourceClass) ;
}
while (sourceClass != null );
this . configurationClasses . put (configClass , configClass);
}
好吧,底下又是调 **doXXX**
方法了,那就废话不多说,直接莽进去就完事了。
2.6 doProcessConfigurationClass - 解析配置类
又高能!这个方法又是好长呀!不过这里面的部分几乎都有大用途哦,我们分解着来看吧。
2.6.1 处理@Component注解
复制 protected final SourceClass doProcessConfigurationClass( ConfigurationClass configClass , SourceClass sourceClass)
throws IOException {
if ( configClass . getMetadata () . isAnnotated ( Component . class . getName ())) {
processMemberClasses(configClass , sourceClass) ;
}
// .............
}
一上来,它就会判断这个类是否有标注 @Component
注解。因为所有的 @Configuration
类必定是 @Component
,所以该逻辑必进。而内部执行的 processMemberClasses
方法如下:
复制 private void processMemberClasses( ConfigurationClass configClass , SourceClass sourceClass ,
Predicate< String > filter) throws IOException {
// 获取配置类中的所有内部类
Collection < SourceClass > memberClasses = sourceClass . getMemberClasses ();
if ( ! memberClasses . isEmpty ()) {
List < SourceClass > candidates = new ArrayList <>( memberClasses . size ());
// 循环解析内部类
for ( SourceClass memberClass : memberClasses) {
// 如果内部类也是配置类,则它们也会被解析
if ( ConfigurationClassUtils . isConfigurationCandidate ( memberClass . getMetadata ()) &&
! memberClass . getMetadata () . getClassName () . equals ( configClass . getMetadata () . getClassName ())) {
candidates . add (memberClass);
}
}
OrderComparator . sort (candidates);
for ( SourceClass candidate : candidates) {
// 防止循环@Import的处理:如果两个配置类互相@Import,则视为错误
if ( this . importStack . contains (configClass)) {
this . problemReporter . error ( new CircularImportProblem(configClass , this . importStack ) );
} else {
this . importStack . push (configClass);
try {
// 递归解析内部的配置类
processConfigurationClass( candidate . asConfigClass(configClass) , filter) ;
}
finally {
this . importStack . pop ();
}
}
}
}
}
哦 ~ 合计着这个方法是处理内部类的啊,而且还是递归处理,这个套路很像上面 <beans>
的 xml 递归解析哦。那好吧,这里面的逻辑也不复杂,扫一眼过去就得了,不要浪费太多时间。
2.6.2 处理@PropertySource注解
复制 // ............
// Process any @PropertySource annotations
for ( AnnotationAttributes propertySource : AnnotationConfigUtils . attributesForRepeatable (
sourceClass . getMetadata () , PropertySources . class ,
org . springframework . context . annotation . PropertySource . class )) {
if ( this . environment instanceof ConfigurableEnvironment) {
processPropertySource(propertySource) ;
}
// else logger ......
}
// ............
接下来是处理 @PropertySource
注解了,可以发现借助 AnnotationConfigUtils
可以很容易的取出配置类上标注的所有注解信息,然后筛选出指定的注解属性即可。而内部的 processPropertySource
方法就在真正的封装 PropertySource
导入的资源文件:
复制 private void processPropertySource( AnnotationAttributes propertySource) throws IOException {
// 解析@PropertySource注解的属性
String name = propertySource . getString ( "name" );
if ( ! StringUtils . hasLength (name)) {
name = null ;
}
String encoding = propertySource . getString ( "encoding" );
if ( ! StringUtils . hasLength (encoding)) {
encoding = null ;
}
String [] locations = propertySource . getStringArray ( "value" );
// ......
for ( String location : locations) {
try {
// 处理路径,加载资源文件,并添加进Environment中
String resolvedLocation = this . environment . resolveRequiredPlaceholders (location);
Resource resource = this . resourceLoader . getResource (resolvedLocation);
addPropertySource( factory . createPropertySource(name , new EncodedResource(resource , encoding))) ;
} // catch ......
}
}
前面的一大堆操作都是拿 @PropertySource
的一些属性等等,最后的 for 循环中才是封装资源文件,存放进 Environment
的部分,整体逻辑也是比较简单的,咱就不深入研究咯(主要关注 bean 相关的东西哈)。
2.6.3 处理@ComponentScan注解
复制 // ............
// Process any @ComponentScan annotations
Set < AnnotationAttributes > componentScans = AnnotationConfigUtils . attributesForRepeatable (
sourceClass . getMetadata () , ComponentScans . class , ComponentScan . class );
if ( ! componentScans . isEmpty () &&
! this . conditionEvaluator . shouldSkip ( sourceClass . getMetadata () , ConfigurationPhase . REGISTER_BEAN )) {
// 如果有@ComponentScans,则要取出里面所有的@ComponentScan依次扫描
for ( AnnotationAttributes componentScan : componentScans) {
// 【复杂】借助ComponentScanAnnotationParser扫描
Set < BeanDefinitionHolder > scannedBeanDefinitions =
this . componentScanParser . parse (componentScan , sourceClass . getMetadata () . getClassName ());
// 是否扫描到了其它的注解配置类
for ( BeanDefinitionHolder holder : scannedBeanDefinitions) {
BeanDefinition bdCand = holder . getBeanDefinition () . getOriginatingBeanDefinition ();
if (bdCand == null ) {
bdCand = holder . getBeanDefinition ();
}
if ( ConfigurationClassUtils . checkConfigurationClassCandidate (bdCand , this . metadataReaderFactory )) {
// 如果扫描到了,递归解析
parse( bdCand . getBeanClassName() , holder . getBeanName()) ;
}
}
}
}
// ............
接下来的部分是处理 @ComponentScan
注解了,整个流程也不复杂。注意一点:@ComponentScan
可以标注多个,并且 Spring 4.3 后多了一个 @ComponentScans
注解,它可以组合多个 @ComponentScan
注解,所以这里是 for 循环解析 @ComponentScan
。
中间的部分,它使用 ComponentScanAnnotationParser
来委托处理包扫描的工作,可能会有小伙伴产生疑惑:不是包扫描的组件是 ClassPathBeanDefinitionScanner
吗?它是谁?先别着急,我们进到 ComponentScanAnnotationParser
的 parse
方法中,看一看内部的实现:(嗯,第一行就把 ClassPathBeanDefinitionScanner
创建出来了 ~ )
复制 public Set< BeanDefinitionHolder > parse( AnnotationAttributes componentScan , final String declaringClass) {
// 构造ClassPathBeanDefinitionScanner
ClassPathBeanDefinitionScanner scanner = new ClassPathBeanDefinitionScanner( this . registry ,
componentScan . getBoolean( "useDefaultFilters" ) , this . environment , this . resourceLoader ) ;
// 解析@ComponentScan中的属性 ......
Class < ? extends BeanNameGenerator > generatorClass = componentScan . getClass ( "nameGenerator" );
// 整理要扫描的basePackages
Set < String > basePackages = new LinkedHashSet <>();
String [] basePackagesArray = componentScan . getStringArray ( "basePackages" );
for ( String pkg : basePackagesArray) {
String [] tokenized = StringUtils . tokenizeToStringArray ( this . environment . resolvePlaceholders (pkg) ,
ConfigurableApplicationContext . CONFIG_LOCATION_DELIMITERS );
Collections . addAll (basePackages , tokenized);
}
for ( Class < ? > clazz : componentScan . getClassArray ( "basePackageClasses" )) {
basePackages . add ( ClassUtils . getPackageName (clazz));
}
// 没有声明basePackages,则当前配置类所在的包即为根包
if ( basePackages . isEmpty ()) {
basePackages . add ( ClassUtils . getPackageName (declaringClass));
}
// ......
// 【扫描】执行包扫描动作
return scanner . doScan ( StringUtils . toStringArray (basePackages));
}
顺序走下来,大概这个方法只干了三件事情:
构造 ClassPathBeanDefinitionScanner
,并封装 @ComponentScan
注解中的属性
整理要进行包扫描的 basePackages
,以及 include 和 exclude 的过滤器
前面两个步骤都是准备动作,真正的包扫描那还得看 ClassPathBeanDefinitionScanner
,来吧,咱直接进到最底下的 doScan
方法中:
复制 protected Set< BeanDefinitionHolder > doScan( String ... basePackages ) {
// assert ......
Set < BeanDefinitionHolder > beanDefinitions = new LinkedHashSet <>();
for ( String basePackage : basePackages) {
// 【真正的包扫描动作在这里】
Set < BeanDefinition > candidates = findCandidateComponents(basePackage) ;
for ( BeanDefinition candidate : candidates) {
// 处理scope(默认情况下是singleton)
ScopeMetadata scopeMetadata = this . scopeMetadataResolver . resolveScopeMetadata (candidate);
candidate . setScope ( scopeMetadata . getScopeName ());
// 生成bean的名称
String beanName = this . beanNameGenerator . generateBeanName (candidate , this . registry );
if (candidate instanceof AbstractBeanDefinition) {
postProcessBeanDefinition((AbstractBeanDefinition) candidate , beanName) ;
}
// 处理bean中的@Lazy、@Primary等注解
if (candidate instanceof AnnotatedBeanDefinition) {
AnnotationConfigUtils . processCommonDefinitionAnnotations ((AnnotatedBeanDefinition) candidate);
}
if ( checkCandidate(beanName , candidate) ) {
BeanDefinitionHolder definitionHolder = new BeanDefinitionHolder(candidate , beanName) ;
// 设置AOP相关的属性(如果支持的话)
definitionHolder = AnnotationConfigUtils.applyScopedProxyMode(scopeMetadata, definitionHolder, this.registry);
beanDefinitions . add (definitionHolder);
// 注册进BeanDefinitionRegistry
registerBeanDefinition(definitionHolder , this . registry ) ;
}
}
}
return beanDefinitions;
}
从上往下的逻辑条理还是很清晰的,只要扫描到了符合的类(默认被 @Component
注解标注的类),就会包装为 BeanDefinition
,然后对这些 BeanDefinition
进行一些额外的处理,最终注册进 BeanDefinitionRegistry
。不过核心的扫描方法还是封装方法了,咱进入 for 循环的第一句 findCandidateComponents
方法中:
复制 public Set< BeanDefinition > findCandidateComponents( String basePackage) {
if ( this . componentsIndex != null && indexSupportsIncludeFilters() ) {
return addCandidateComponentsFromIndex( this . componentsIndex , basePackage) ;
} else {
return scanCandidateComponents(basePackage) ;
}
}
private Set< BeanDefinition > scanCandidateComponents( String basePackage) {
Set < BeanDefinition > candidates = new LinkedHashSet <>();
try {
// 此处可处理 [/**/service/*Service.class] 这样的表达式
String packageSearchPath = ResourcePatternResolver . CLASSPATH_ALL_URL_PREFIX +
resolveBasePackage(basePackage) + '/' + this . resourcePattern ;
Resource [] resources = getResourcePatternResolver() . getResources (packageSearchPath);
for ( Resource resource : resources) {
if ( resource . isReadable ()) {
try {
// 加载.class字节码
MetadataReader metadataReader = getMetadataReaderFactory() . getMetadataReader (resource);
// 如果符合匹配规则,则封装为ScannedGenericBeanDefinition
if ( isCandidateComponent(metadataReader) ) {
ScannedGenericBeanDefinition sbd = new ScannedGenericBeanDefinition(metadataReader) ;
sbd . setSource (resource);
if ( isCandidateComponent(sbd) ) {
candidates . add (sbd);
}
}
} // catch .......
}
}
} // catch ......
return candidates;
}
整体逻辑还是简单的很:它会将带有通配符的 Ant 风格(诸如 /xxx/**/*.class
)的路径解析出来,并加载到对应的类,封装为 ScannedGenericBeanDefinition
,完事。
到这里,包扫描的处理就完成了,@ComponentScan
的处理也就结束了。
2.6.4 处理@Import注解
复制 // ............
// Process any @Import annotations
processImports(configClass , sourceClass , getImports(sourceClass) , true ) ;
// ............
嚯,就一句话啊,那咱直接点进去吧:
复制 private void processImports( ConfigurationClass configClass , SourceClass currentSourceClass ,
Collection< SourceClass > importCandidates , Predicate< String > exclusionFilter ,
boolean checkForCircularImports) {
if ( importCandidates . isEmpty ()) {
return ;
}
// 防止循环@Import导入
if (checkForCircularImports && isChainedImportOnStack(configClass) ) {
this . problemReporter . error ( new CircularImportProblem(configClass , this . importStack ) );
}
else {
this . importStack . push (configClass);
try {
for ( SourceClass candidate : importCandidates) {
// 处理ImportSelector
if ( candidate . isAssignable ( ImportSelector . class )) {
Class < ? > candidateClass = candidate . loadClass ();
ImportSelector selector = ParserStrategyUtils.instantiateClass(candidateClass, ImportSelector.class,
this . environment , this . resourceLoader , this . registry );
Predicate < String > selectorFilter = selector . getExclusionFilter ();
if (selectorFilter != null ) {
exclusionFilter = exclusionFilter . or (selectorFilter);
}
// DeferredImportSelector的执行时机后延
if (selector instanceof DeferredImportSelector) {
this . deferredImportSelectorHandler . handle (configClass , (DeferredImportSelector) selector);
} else {
// 执行ImportSelector的selectImports方法,并注册导入的类
String [] importClassNames = selector . selectImports ( currentSourceClass . getMetadata ());
Collection<SourceClass> importSourceClasses = asSourceClasses(importClassNames, exclusionFilter);
processImports(configClass , currentSourceClass , importSourceClasses , exclusionFilter , false ) ;
}
}
// 处理ImportBeanDefinitionRegistrar
else if ( candidate . isAssignable ( ImportBeanDefinitionRegistrar . class )) {
Class < ? > candidateClass = candidate . loadClass ();
ImportBeanDefinitionRegistrar registrar =
ParserStrategyUtils . instantiateClass (candidateClass , ImportBeanDefinitionRegistrar . class ,
this . environment , this . resourceLoader , this . registry );
configClass . addImportBeanDefinitionRegistrar (registrar , currentSourceClass . getMetadata ());
}
else {
// 导入普通类 / 配置类
this . importStack . registerImport (
currentSourceClass . getMetadata () , candidate . getMetadata () . getClassName ());
processConfigurationClass( candidate . asConfigClass(configClass) , exclusionFilter) ;
}
}
} // catch ......
finally {
this . importStack . pop ();
}
}
}
可以发现,整体逻辑非常有序,它分别对 ImportSelector
、ImportBeanDefinitionRegistrar
、普通类 / 配置类都做了处理,并递归解析其中存在的配置类,整体并不复杂,小伙伴们看一看有个印象即可,重要的是记住它们处理的位置,以便日后出现问题时排错定位。
2.6.5 处理@ImportResource注解
复制 // ............
// Process any @ImportResource annotations
AnnotationAttributes importResource =
AnnotationConfigUtils . attributesFor ( sourceClass . getMetadata () , ImportResource . class );
if (importResource != null ) {
String [] resources = importResource . getStringArray ( "locations" );
Class < ? extends BeanDefinitionReader > readerClass = importResource . getClass ( "reader" );
for ( String resource : resources) {
String resolvedResource = this . environment . resolveRequiredPlaceholders (resource);
configClass . addImportedResource (resolvedResource , readerClass);
}
}
// ............
前面我们学过了,在注解配置类上标注 @ImportResource
可以导入 xml 配置文件,而解析这些 @ImportResource
的逻辑就在这里。不过看源码的套路中,怎么只是把配置文件的路径放入了 configClass
而已呢?咋不解析呀?莫慌,我们之前看 ConfigurationClassPostProcessor
的后置处理 processConfigBeanDefinitions
方法中,不是在 parse
方法下面还有个 loadBeanDefinitions
方法嘛,过会我们看看它就知道了。
2.6.6 处理@Bean注解
复制 // ............
// Process individual @Bean methods
Set < MethodMetadata > beanMethods = retrieveBeanMethodMetadata(sourceClass) ;
for ( MethodMetadata methodMetadata : beanMethods) {
configClass . addBeanMethod ( new BeanMethod(methodMetadata , configClass) );
}
// ............
合着 @Bean
的处理也只是存起来呗?那它啥时候处理啊?不会跟上面的 @ImportResource
放在一块处理吧?哎,想法可以保留,过会我们往下看到了自然就揭晓了。不过它是如何把这些 @Bean
方法都拿出来的,我们还得去看看 retrieveBeanMethodMetadata
方法:
复制 private Set< MethodMetadata > retrieveBeanMethodMetadata( SourceClass sourceClass) {
AnnotationMetadata original = sourceClass . getMetadata ();
// 获取被@Bean注解标注的方法
Set < MethodMetadata > beanMethods = original . getAnnotatedMethods ( Bean . class . getName ());
if ( beanMethods . size () > 1 && original instanceof StandardAnnotationMetadata) {
try {
AnnotationMetadata asm =
this . metadataReaderFactory . getMetadataReader ( original . getClassName ()) . getAnnotationMetadata ();
Set < MethodMetadata > asmMethods = asm . getAnnotatedMethods ( Bean . class . getName ());
if ( asmMethods . size () >= beanMethods . size ()) {
Set < MethodMetadata > selectedMethods = new LinkedHashSet <>( asmMethods . size ());
// 筛选每个方法
for ( MethodMetadata asmMethod : asmMethods) {
for ( MethodMetadata beanMethod : beanMethods) {
if ( beanMethod . getMethodName () . equals ( asmMethod . getMethodName ())) {
selectedMethods . add (beanMethod);
break ;
}
}
}
if ( selectedMethods . size () == beanMethods . size ()) {
beanMethods = selectedMethods;
}
}
} // catch ......
}
return beanMethods;
}
一上来我们就看到 @Bean
注解的方法过滤了,经过这个过滤之后,就只会得到配置类中被 @Bean
注解标注的方法。
Debug 到这里,可以发现此处确实把配置类中的 person()
方法取了出来:
不过这里可能会有小伙伴产生疑惑:明明反射就可以拿到这些被 @Bean
注解标注的方法,但是中间的读取部分都把 ASM (读取字节码的技术)搬出来了,为什么要如此的大动干戈呢?哎,这里我们要多解释一个点了:**使用 JVM 的标准反射,在不同的 JVM 、或者同一个 JVM 上的不同应用中,返回的方法列表顺序可能是不同的。**简言之,JVM 的标准反射不保证方法列表返回的顺序一致 。所以,想要保证程序在任何 JVM 上、任何应用中,加载同一个 .class 文件的方法列表都返回相同的顺序,那就只能读取字节码了,而读取字节码的技术,Spring 选择了 ASM 。
所以,这里 Spring 使用 ASM 读取字节码的目的,是为了保证加载配置类中 **@Bean**
方法的从上到下的顺序与源文件 .java 中一致 。
2.6.7 处理父接口
复制 // ............
// Process default methods on interfaces
processInterfaces(configClass , sourceClass) ;
// ............
又是一个一句话方法,咱点进去看一看:
复制 private void processInterfaces( ConfigurationClass configClass , SourceClass sourceClass) throws IOException {
for ( SourceClass ifc : sourceClass . getInterfaces ()) {
// 寻找接口中标注了@Bean的方法
Set < MethodMetadata > beanMethods = retrieveBeanMethodMetadata(ifc) ;
for ( MethodMetadata methodMetadata : beanMethods) {
if ( ! methodMetadata . isAbstract ()) {
configClass . addBeanMethod ( new BeanMethod(methodMetadata , configClass) );
}
}
processInterfaces(configClass , ifc) ;
}
}
注意看这段逻辑,它会把配置类实现的所有接口都拿出来,并且遍历所有标注了 @Bean
的方法,并添加到 bean 的注册信息中。跟上面一样,它只是存起来,并没有封装为 BeanDefinition
,所以这里只是解析动作而已。
2.6.8 父类的返回
复制 // ............
// Process superclass, if any
if ( sourceClass . getMetadata () . hasSuperClass ()) {
String superclass = sourceClass . getMetadata () . getSuperClassName ();
if (superclass != null && ! superclass . startsWith ( "java" ) &&
! this . knownSuperclasses . containsKey (superclass)) {
this . knownSuperclasses . put (superclass , configClass);
return sourceClass . getSuperClass ();
}
}
return null ;
}
终于看到最后一部分了,因为上面的解析处理逻辑都看完了,还剩下最后一个部分。如果配置类存在父类的话,父类也应该一起加载,所以这里会取到配置类的父类,并继续递归处理。逻辑相对的不算复杂,咱就不深入研究了。
2.7 loadBeanDefinitions - 加载BeanDefinition
到这里,配置类的解析就完成了,回到 ConfigurationClassPostProcessor
中,解析完那些 @Bean
后还要注册为 BeanDefinition
呢,而这个方法的核心在 loadBeanDefinitions
中,我们也来研究。
this.reader.loadBeanDefinitions(configClasses);
的执行会来到 ConfigurationClassBeanDefinitionReader
中:
复制 public void loadBeanDefinitions( Set< ConfigurationClass > configurationModel) {
TrackedConditionEvaluator trackedConditionEvaluator = new TrackedConditionEvaluator() ;
for ( ConfigurationClass configClass : configurationModel) {
loadBeanDefinitionsForConfigurationClass(configClass , trackedConditionEvaluator) ;
}
}
又是循环,来吧,直接进到 loadBeanDefinitionsForConfigurationClass
中:
复制 private void loadBeanDefinitionsForConfigurationClass(
ConfigurationClass configClass , TrackedConditionEvaluator trackedConditionEvaluator) {
// 与条件装配有关
if ( trackedConditionEvaluator . shouldSkip (configClass)) {
String beanName = configClass . getBeanName ();
if ( StringUtils . hasLength (beanName) && this . registry . containsBeanDefinition (beanName)) {
this . registry . removeBeanDefinition (beanName);
}
this . importRegistry . removeImportingClass ( configClass . getMetadata () . getClassName ());
return ;
}
// 如果当前配置类是被@Import的,要把自己注册进BeanFactory
if ( configClass . isImported ()) {
registerBeanDefinitionForImportedConfigurationClass(configClass) ;
}
// 注册@Bean注解方法
for ( BeanMethod beanMethod : configClass . getBeanMethods ()) {
loadBeanDefinitionsForBeanMethod(beanMethod) ;
}
// 注册来自xml配置文件的bean
loadBeanDefinitionsFromImportedResources( configClass . getImportedResources()) ;
// 注册来自ImportBeanDefinitionRegistrar的bean
loadBeanDefinitionsFromRegistrars( configClass . getImportBeanDefinitionRegistrars()) ;
}
这里面的逻辑分为 4 个部分,咱还是分别来看。
2.7.1 registerBeanDefinitionForImportedConfigurationClass
第一个步骤是将配置类自身注册进 BeanFactory
。按照包扫描的原则来看,只要是 @Configuration
,那就必然也是 @Component
,就应该一起注册到 BeanFactory
中。但如果配置类是通过 @Import
的方式导入的,那就不会主动将自己注册进 BeanFactory
,所以在这里,它需要将那些被 @Import
进去的配置类,也全部注册到 BeanFactory
中。
从源码实现上看,这就是一个最最普通的 BeanDefinition
的注册,没有任何额外的花里胡哨的操作,所以这个我们也没必要深查了,看一下就好咯。
复制 private void registerBeanDefinitionForImportedConfigurationClass( ConfigurationClass configClass) {
AnnotationMetadata metadata = configClass . getMetadata ();
// 构造BeanDefinition
AnnotatedGenericBeanDefinition configBeanDef = new AnnotatedGenericBeanDefinition(metadata) ;
ScopeMetadata scopeMetadata = scopeMetadataResolver . resolveScopeMetadata (configBeanDef);
configBeanDef . setScope ( scopeMetadata . getScopeName ());
String configBeanName = this . importBeanNameGenerator . generateBeanName (configBeanDef , this . registry );
AnnotationConfigUtils . processCommonDefinitionAnnotations (configBeanDef , metadata);
// 包装BeanDefinitionHolder
BeanDefinitionHolder definitionHolder = new BeanDefinitionHolder(configBeanDef , configBeanName) ;
definitionHolder = AnnotationConfigUtils . applyScopedProxyMode (scopeMetadata , definitionHolder , this . registry );
// 注册进BeanDefinitionRegistry
this . registry . registerBeanDefinition ( definitionHolder . getBeanName () , definitionHolder . getBeanDefinition ());
configClass . setBeanName (configBeanName);
// logger ......
}
2.7.2 loadBeanDefinitionsForBeanMethod
这个步骤就是加载刚才处理过的那些 @Bean
方法了,咱来看看它怎么处理。
复制 private void loadBeanDefinitionsForBeanMethod(BeanMethod beanMethod) {
ConfigurationClass configClass = beanMethod.getConfigurationClass();
MethodMetadata metadata = beanMethod.getMetadata();
String methodName = metadata.getMethodName();
// 如果条件装配将其跳过,则该@Bean标注的方法,对应的BeanDefinition不会注册进BeanDefinitionRegistry
if (this.conditionEvaluator.shouldSkip(metadata, ConfigurationPhase.REGISTER_BEAN)) {
configClass.skippedBeanMethods.add(methodName);
return;
}
if (configClass.skippedBeanMethods.contains(methodName)) {
return;
}
// 检查方法上真的有@Bean注解吗
AnnotationAttributes bean = AnnotationConfigUtils.attributesFor(metadata, Bean.class);
// assert ......
// 如果bean指定了多个name,则第1个为唯一标识,其余的都是alias别名
List<String> names = new ArrayList<>(Arrays.asList(bean.getStringArray("name")));
String beanName = (!names.isEmpty() ? names.remove(0) : methodName);
// Register aliases even when overridden
for (String alias : names) {
this.registry.registerAlias(beanName, alias);
}
// 注解中配置了@Bean,与xml中的bean撞车了,会抛出异常
if (isOverriddenByExistingDefinition(beanMethod, beanName)) {
if (beanName.equals(beanMethod.getConfigurationClass().getBeanName())) {
// throw ex ......
}
return;
}
// 构造BeanDefinition
ConfigurationClassBeanDefinition beanDef = new ConfigurationClassBeanDefinition(configClass, metadata);
beanDef.setSource(this.sourceExtractor.extractSource(metadata, configClass.getResource()));
// 【复杂】解析@Bean所在方法的修饰符
if (metadata.isStatic()) {
// static @Bean method
if (configClass.getMetadata() instanceof StandardAnnotationMetadata) {
beanDef.setBeanClass(((StandardAnnotationMetadata) configClass.getMetadata()).getIntrospectedClass());
} else {
beanDef.setBeanClassName(configClass.getMetadata().getClassName());
}
beanDef.setUniqueFactoryMethodName(methodName);
}
else {
// instance @Bean method
beanDef.setFactoryBeanName(configClass.getBeanName());
beanDef.setUniqueFactoryMethodName(methodName);
}
// 处理@Bean的属性(name、initMethod等)、额外的注解(@Lazy、@DependsOn等) ......
// 注册进BeanDefinitionRegistry
this.registry.registerBeanDefinition(beanName, beanDefToRegister);
}
一样标准的套路:检查 → 构造 BeanDefinition
→ 封装信息 → 注册进 BeanDefinitionRegistry
。最下面的部分,那些处理 @Bean
的属性、额外的注解解析都比较简单了,小伙伴们可以自行借助 IDE 去看看,小册就不展开解释了。
不过这里面有一个还蛮关键的部分,要给小伙伴们解释一下,就是上面的这个 metadata.isStatic()
,它的判断逻辑下面,会给 BeanDefinition
封装两个属性:setBeanClassName
/ setFactoryBeanName
、setUniqueFactoryMethodName
,它们俩分别指定了当前 @Bean
方法所在的配置类,以及方法名。小伙伴们可以先猜想一下,封装它的作用是什么呢?
回想一下前面 @Component
注解标注的类形成的 BeanDefinition
,以及 xml 配置文件转换出来的 BeanDefinition
有个什么特点?它们都指定了 bean 的全限定名、属性注入等 ,而且最终创建的对象一定是通过反射 创建。而在注解配置类中的 @Bean
方法是有实际的代码执行 ,属于编程式创建 ,无法使用(也不适合用)反射创建 bean 对象,所以为了在后面能正常创建出 bean 对象,此处就需要记录该 bean 的定义源(包含注解配置类和方法名),以保证在创建 bean 对象时,能够使用反射调用该注解配置类的方法,生成 bean 对象并返回 。
2.7.3 loadBeanDefinitionsFromImportedResources
这部分是解析从注解配置类上取到的 xml 配置文件的路径,有了前面的分析,我们马上就能猜到,它又要用 XmlBeanDefinitionReader 那一套来搞了,点开源码,发现果然如此:
复制 private void loadBeanDefinitionsFromImportedResources(
Map<String, Class<? extends BeanDefinitionReader>> importedResources) {
Map<Class<?>, BeanDefinitionReader> readerInstanceCache = new HashMap<>();
importedResources.forEach((resource, readerClass) -> {
if (BeanDefinitionReader.class == readerClass) {
if (StringUtils.endsWithIgnoreCase(resource, ".groovy")) {
readerClass = GroovyBeanDefinitionReader.class;
}
else {
// 创建XmlBeanDefinitionReader,以备下面的解析
readerClass = XmlBeanDefinitionReader.class;
}
}
BeanDefinitionReader reader = readerInstanceCache.get(readerClass);
// reader的缓存等等
// 调用XmlBeanDefinitionReader解析资源文件
reader.loadBeanDefinitions(resource);
});
}
很容易理解了吧,里面的套路想必不用小册多解释,小伙伴们自己就已经有很清楚的认识了吧。
2.7.4 loadBeanDefinitionsFromRegistrars
最后一部分是执行 ImportBeanDefinitionRegistrar
,这个就更简单了,既然是接口,那执行它们的话,只需要调用 registerBeanDefinitions
方法就可以吧,进到方法内部,发现真就是这么简单:
复制 private void loadBeanDefinitionsFromRegistrars(Map<ImportBeanDefinitionRegistrar, AnnotationMetadata> registrars) {
registrars.forEach((registrar, metadata) ->
registrar.registerBeanDefinitions(metadata, this.registry, this.importBeanNameGenerator));
}
OK ,那到此为止,注解配置类中 BeanDefinition
的注册也就全部理清楚了,顺便我们把整个注解配置类的解析流程和逻辑也都研究了一遍,小伙伴们要做好笔记呀。
2.8 小结
同样总结一下注解配置类的加载与解析过程:注解配置类的解析发生在 **BeanDefinitionRegistryPostProcessor**
的执行阶段,它对应的核心后置处理器是 **ConfigurationClassPostProcessor**
,它主要负责两个步骤三件事情:解析配置类、注册 **BeanDefinition**
。三件事情包括:1) 解析 **@ComponentScan**
并进行包扫描,实际进行包扫描的组件是 **ClassPathBeanDefinitionScanner**
;2) 解析配置类中的注解(如 **@Import**
、 **@ImportResource**
、 **@PropertySource**
等)并处理,工作的核心组件是 **ConfigurationClassParser**
;3) 解析配置类中的 **@Bean**
并封装 **BeanDefinition**
,实际解析的组件是 **ConfigurationClassBeanDefinitionReader**
。
3. BeanDefinition的后置处理
执行完 ConfigurationClassPostProcessor
之后,在 xml 和配置类中定义的 BeanDefinition
就都解析和准备好了,但是还没有加载进 BeanDefinitionRegistry
中。下面还会有 BeanDefinitionRegistryPostProcessor
和 BeanFactoryPostProcessor
的执行,而它们的执行时机还是上面的 PostProcessorRegistrationDelegate#invokeBeanFactoryPostProcessors
方法中。
至于这些处理的机制,咱在前面的 28 章 BeanFactoryPostProcessor
章节都讲解过了,如果忘记的小伙伴们记得回去复习哦。
执行完这些后置处理器之后,BeanDefinition
的后置处理也就算结束了。
4. 总结
首先,bean 的生命周期分为 **BeanDefinition**
阶段和 bean 实例阶段。
BeanDefinition
阶段分为加载 xml 配置文件、解析注解配置类、编程式构造 BeanDefinition
、BeanDefinition
的后置处理,一共四个部分。
加载 xml 配置文件 发生在基于 xml 配置文件的 ApplicationContext
中 refresh
方法的 BeanFactory
初始化阶段,此时 BeanFactory
刚刚构建完成,它会借助 XmlBeanDefinitionReader
来加载 xml 配置文件,并使用 DefaultBeanDefinitionDocumentReader
解析 xml 配置文件,封装声明的 <bean>
标签内容并转换为 BeanDefinition
。
解析注解配置类 发生在 ApplicationContext
中 refresh
方法的 BeanDefinitionRegistryPostProcessor
执行阶段,该阶段首先会执行 ConfigurationClassPostProcessor
的 postProcessBeanDefinitionRegistry
方法。ConfigurationClassPostProcessor
中会找出所有的配置类,排序后依次解析,并借助 ClassPathBeanDefinitionScanner
实现包扫描的 BeanDefinition
封装,借助 ConfigurationClassBeanDefinitionReader
实现 @Bean
注解方法的 BeanDefinition
解析和封装。
编程式构造 **BeanDefinition**
也是发生在 ApplicationContext
中 refresh
方法的 BeanDefinitionRegistryPostProcessor
执行阶段,由于 BeanDefinitionRegistryPostProcessor
中包含 ConfigurationClassPostProcessor
,而 ConfigurationClassPostProcessor
会执行 ImportBeanDefinitionRegistrar
的逻辑,从而达到编程式构造 BeanDefinition
并注入到 BeanDefinitionRegistry
的目的;另外,实现了 BeanDefinitionRegistryPostProcessor
的类也可以编程式构造 BeanDefinition
,注入 BeanDefinitionRegistry
。