Spring BeanPostProcessor

1. 概述

1.1 官方文档

官方文档的 1.8 Container Extension Points (容器扩展点) 章节中,专门拿出了一个小节讲解 BeanPostProcessor 的使用。由于这段内容比较长,小册将其拆解开解释。

Customizing Beans by Using a BeanPostProcessor

1.1.1 BeanPostProcessor是一个容器扩展点

The BeanPostProcessor interface defines callback methods that you can implement to provide your own (or override the container’s default) instantiation logic, dependency resolution logic, and so forth. If you want to implement some custom logic after the Spring container finishes instantiating, configuring, and initializing a bean, you can plug in one or more custom BeanPostProcessor implementations.

BeanPostProcessor 接口定义了回调方法,您可以实现这些回调方法以提供自己的(或覆盖容器默认的)实例化逻辑、依赖处理 / 解析逻辑等。如果您想在 IOC 容器完成实例化、配置、初始化 bean 之后实现一些自定义逻辑,则可以注册一个或多个自定义的 BeanPostProcessor 实现。

BeanPostProcessor 是一个回调机制的扩展点,它的核心工作点是在 bean 的初始化前后做一些额外的处理(包括预初始化 bean 的属性值、注入特定的依赖,甚至扩展生成代理对象等)。

1.1.2 BeanPostProcessor的执行可以指定先后顺序

You can configure multiple BeanPostProcessor instances, and you can control the order in which these BeanPostProcessor instances run by setting the order property. You can set this property only if the BeanPostProcessor implements the Ordered interface. If you write your own BeanPostProcessor, you should consider implementing the Ordered interface, too.

您可以配置多个 BeanPostProcessor 实例,并且可以通过设置 order 属性来控制这些 BeanPostProcessor 实例的运行顺序。仅当 BeanPostProcessor 实现 Ordered 接口时,才可以设置此属性。如果您编写自己的 BeanPostProcessor ,则也应该考虑实现 Ordered 接口。

与监听器一样,后置处理器也可以指定多个,并且可以通过实现 Ordered 接口,指定后置处理器工作的先后顺序。这看上去似乎不是特别有必要,小册举一个比较简单的例子:

如果有两个后置处理器,分别处理 IOC 容器中的 Service 层实现类,一个负责注入 Dao 层的接口,一个负责统一控制事务,那这个时候就需要先让注入 Dao 接口的后置处理器先工作,让控制事务的后置处理器往后稍稍。

1.1.3 BeanPostProcessor在IOC容器间互不影响

BeanPostProcessor instances operate on bean (or object) instances. That is, the Spring IoC container instantiates a bean instance and then BeanPostProcessor instances do their work. BeanPostProcessor instances are scoped per-container. This is relevant only if you use container hierarchies. If you define a BeanPostProcessor in one container, it post-processes only the beans in that container. In other words, beans that are defined in one container are not post-processed by a BeanPostProcessor defined in another container, even if both containers are part of the same hierarchy. To change the actual bean definition (that is, the blueprint that defines the bean), you instead need to use a BeanFactoryPostProcessor, as described in Customizing Configuration Metadata with a BeanFactoryPostProcessor.

BeanPostProcessor 在 bean(或对象)实例上运行。也就是说,Spring 的 IOC 容器会实例化出一个 bean 的对象实例,然后 BeanPostProcessor 完成它的工作。 BeanPostProcessor 是按容器划分作用域的(仅在使用容器层次结构时,这种设定才有意义)。如果在一个容器中定义 BeanPostProcessor ,它将仅对该容器中的 bean 进行后置处理。换句话说,一个容器中定义的 bean 不会由另一个容器中定义的 BeanPostProcessor 进行后处理,即使这两个容器是同一层次结构的一部分。 要更改实际的 BeanDefinition 信息,您需要使用 BeanFactoryPostProcessor ,如使用 BeanFactoryPostProcessor 自定义配置元数据中的信息。

从这一长串文档中,提取出几个关键信息:**BeanPostProcessor** 作用于 bean 对象的创建后不同 IOC 容器中的 **BeanPostProcessor** 不会互相起作用。这些特性,在下面的演示中都会有体现,小伙伴们无需着急。

另外,最后一句话它提到了,如果要处理 BeanDefinition ,要使用 BeanFactoryPostProcessor ,这也是上一章我们用的那个陌生的 API 了,它的使用,小册放到下一章来讲解,本章只讲解 BeanPostProcessor 的使用。

1.2 javadoc

翻看 BeanPostProcessor 的 javadoc ,发现它的篇幅也很长,小册只摘取总体描述的部分来阅读。

Factory hook that allows for custom modification of new bean instances — for example, checking for marker interfaces or wrapping beans with proxies. Typically, post-processors that populate beans via marker interfaces or the like will implement postProcessBeforeInitialization, while post-processors that wrap beans with proxies will normally implement postProcessAfterInitialization.

BeanPostProcessor 是一种工厂的回调钩子,它允许对 bean 实例进行自定义修改(例如检查 bean 实现的标记接口,或使用代理包装 bean )。 通常,通过标记接口等填充 bean 的后置处理器将实现 postProcessBeforeInitialization 方法,而使用代理包装 bean 的后置处理器通常将实现 postProcessAfterInitialization 方法。

javadoc 更倾向于教我们怎么用,它也说了,BeanPostProcessor 提供了两个回调时机:bean 的初始化之前bean 的初始化之后,它们分别适合做填充代理的工作。下面咱结合 BeanPostProcessor 的接口设计来看看。

1.3 BeanPostProcessor的设计

BeanPostProcessor 是一个接口,它只定义了两个方法,也就是上面 javadoc 中提到的两个方法:

public interface BeanPostProcessor {
    
    default Object postProcessBeforeInitialization(Object bean, String beanName) throws BeansException {
        return bean;
    }

    default Object postProcessAfterInitialization(Object bean, String beanName) throws BeansException {
        return bean;
    }
}

这两个方法的文档注释也写的非常完善:postProcessBeforeInitialization 方法会在任何 bean 的初始化回调(例如 InitializingBeanafterPropertiesSet 或自定义 init-method )之前执行,而 postProcessAfterInitialization 方法会在任何 bean 的初始化回调(例如 InitializingBeanafterPropertiesSet 或自定义 init-method )之后。

此外,对于 postProcessAfterInitialization 方法,还可以对那些 FactoryBean 创建出来的真实对象进行后置处理,这个我们下面也会有演示。

最后,还是老样子,咱试着总结一下面试中如何概述 BeanPostProcessor

1.4 总结

**BeanPostProcessor** 是一个容器的扩展点,它可以在 bean 的生命周期过程中,初始化阶段前后添加自定义处理逻辑,并且不同 IOC 容器间的 **BeanPostProcessor** 不会相互干预。

2. BeanPostProcessor的使用

下面,咱们就来搞几个例子,体会一下 BeanPostProcessor 的作用。

2.1 快速体会使用

先从最简单的开始,我们不编写任何逻辑,只是注册进去,看看能不能拦截到 bean 的初始化就好。

2.1.1 声明几个bean

最初的案例不需要太花里胡哨的 bean ,就简单整两个吧:

@Component
public class Cat {
    
}

@Component
public class Dog {
    
}

2.1.2 编写后置处理器

声明一个 AnimalBeanPostProcessor ,让它实现 BeanPostProcessor ,然后啥也不干,只打印语句就好:

@Component
public class AnimalBeanPostProcessor implements BeanPostProcessor {
    
    @Override
    public Object postProcessBeforeInitialization(Object bean, String beanName) throws BeansException {
        System.out.println("拦截到Bean的初始化之前:" + beanName);
        return bean;
    }
    
    @Override
    public Object postProcessAfterInitialization(Object bean, String beanName) throws BeansException {
        System.out.println("拦截到Bean的初始化之后:" + beanName);
        return bean;
    }
}

这里注意一个非常重要的设计:它的入参有一个 bean ,类型是 **Object** ,返回值也是 **Object** ,似乎有暗示返回的 bean 可以任意替换的意思了,是不是这样呢,我们过会可以试一试。

2.1.3 测试运行

使用注解驱动 IOC 容器,直接扫描包即可。由于我们只是测试后置处理器的功能,所以在初始化 IOC 容器后不需要做任何操作,那就顺手关掉吧:

public class BeanPostProcessorQuickstartApplication {
    
    public static void main(String[] args) throws Exception {
        AnnotationConfigApplicationContext ctx = new AnnotationConfigApplicationContext(
                "com.linkedbear.spring.postprocessor.a_quickstart");
        ctx.close();
    }
}

运行 main 方法,控制台的打印也说明,cat 和 dog 的初始化被 AnimalBeanPostProcessor 监测到了。

拦截到Bean的初始化之前:cat
拦截到Bean的初始化之后:cat
拦截到Bean的初始化之前:dog
拦截到Bean的初始化之后:dog

2.1.4 修改后置处理器的返回值为任意

既然 BeanPostProcessor 的两个后置处理方法都可以返回任意 Object ,那我们就搞几个特殊的情况试一试。

2.1.4.1 返回null

修改 AnimalBeanPostProcessorpostProcessBeforeInitialization 方法,让返回值改为 null ,并在 postProcessAfterInitialization 中打印 bean 的引用:

@Override
public Object postProcessBeforeInitialization(Object bean, String beanName) throws BeansException {
    System.out.println("拦截到Bean的初始化之前:" + bean);
    return null;
}

@Override
public Object postProcessAfterInitialization(Object bean, String beanName) throws BeansException {
    System.out.println("拦截到Bean的初始化之后:" + bean);
    return bean;
}

重新运行 main 方法,发现 postProcessAfterInitialization 中并没有打印 null ,而是打印了与 postProcessBeforeInitialization 方法中一样的对象:

拦截到Bean的初始化之前:com.linkedbear.spring.postprocessor.a_quickstart.bean.Cat@60285225
拦截到Bean的初始化之后:com.linkedbear.spring.postprocessor.a_quickstart.bean.Cat@60285225
拦截到Bean的初始化之前:com.linkedbear.spring.postprocessor.a_quickstart.bean.Dog@7113b13f
拦截到Bean的初始化之后:com.linkedbear.spring.postprocessor.a_quickstart.bean.Dog@7113b13f

为什么会是这样呢?我都返回了 null 了,你咋又给我找回来了呢?

这里面的原理,可以向上追溯一层方法调用。借助 IDEA ,发现 SpringFramework 调用 BeanPostProcessorpostProcessBeforeInitialization 方法,是在 AbstractAutowireCapableBeanFactory 中的,这里面有一个兜底保护:

@Override
public Object applyBeanPostProcessorsBeforeInitialization(Object existingBean, String beanName)
        throws BeansException {

    Object result = existingBean;
    for (BeanPostProcessor processor : getBeanPostProcessors()) {
        Object current = processor.postProcessBeforeInitialization(result, beanName);
        if (current == null) {
            return result;
        }
        result = current;
    }
    return result;
}

可见框架都帮我们做好了,如果真的返回了 null ,那框架就会认为:你这是一个误操作,我当你没发生过,于是就把原来的 bean 又找回来了。

2.1.4.2 返回其它类型的对象

既然不能返回 null ,那你传 Cat 的时候我换个 Dog 行不?哎,有点意思了哈,我们也来试试。

@Override
public Object postProcessBeforeInitialization(Object bean, String beanName) throws BeansException {
    System.out.println("拦截到Bean的初始化之前:" + bean);
    if (bean instanceof Cat) {
        return new Dog();
    }
    return bean;
}

重新运行 main 方法,发现 Cat 真的变成了 Dog

拦截到Bean的初始化之前:com.linkedbear.spring.postprocessor.a_quickstart.bean.Cat@60285225
拦截到Bean的初始化之后:com.linkedbear.spring.postprocessor.a_quickstart.bean.Dog@7113b13f

所以由这个设计,是不是有一点慌呢?万一真返回错了类型,那岂不是出大问题?

但是话又说回来,谁会搞这种操作呢,所以这个担心是多余的,如果真的要限制住 BeanPostProcessor 的类型控制,我们可以在后面尝试搞一个简单的扩展,小伙伴可以到时候一起写一写,体会一下简单的框架再封装。

2.2 修改bean的属性

既然能拿到 bean 的本体了,那获取 、修改属性这种操作也就很简单啦,咱们也来简单的写一下。

2.2.1 修改bean

Cat 添加一个 name 属性,并添加上 getter 、setter 、toString 方法:

@Component
public class Cat {
    
    private String name;
    
    public String getName() {
        return name;
    }
    
    public void setName(String name) {
        this.name = name;
    }
    
    @Override
    public String toString() {
        return "Cat{" + "name='" + name + '\'' + '}';
    }
}

2.2.2 编写后置处理器

这次我们在后置处理器中添加对属性的操作,可以在后置处理之前修改一下属性,看修改之后是否生效:

@Component
public class CatBeanPostProcessor implements BeanPostProcessor {
    
    @Override
    public Object postProcessBeforeInitialization(Object bean, String beanName) throws BeansException {
        if (bean instanceof Cat) {
            Cat cat = (Cat) bean;
            System.out.println("初始化之前,cat的name为:" + cat.getName());
            cat.setName("zhangsan");
        }
        return bean;
    }
    
    @Override
    public Object postProcessAfterInitialization(Object bean, String beanName) throws BeansException {
        if (bean instanceof Cat) {
            Cat cat = (Cat) bean;
            System.out.println("初始化之后,cat的name为:" + cat.getName());
        }
        return bean;
    }
}

2.2.3 测试运行

测试运行类的写法与上面完全一致,不多解释啦:

public class PostProcessorGetPropertyApplication {
    
    public static void main(String[] args) throws Exception {
        AnnotationConfigApplicationContext ctx = new AnnotationConfigApplicationContext(
                "com.linkedbear.spring.postprocessor.b_getproperty");
        ctx.close();
    }
}

运行 main 方法,控制台打印出修改前后的属性,说明后置处理器确实在 bean 的初始化阶段修改属性。

2.3 执行时机探究

既然文档和 javadoc 中说了,它分别在 bean 的初始化阶段前后执行,具体又是什么样呢?咱也来探究一下。
2.3.1 声明bean

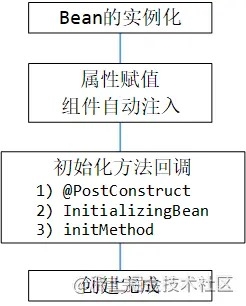
像之前研究 bean 的生命周期那样,搞一个三种初始化方法都带的 Dog 出来:

public class Dog implements InitializingBean {
    
    public void initMethod() {
        System.out.println("initMethod ...");
    }
    
    @PostConstruct
    public void postConstruct() {
        System.out.println("PostConstruct ...");
    }
    
    @Override
    public void afterPropertiesSet() throws Exception {
        System.out.println("InitializingBean ...");
    }
}

2.3.2 编写后置处理器

后置处理器里就不搞花里胡哨了,只打印一下执行时机就好:

public class ExecuteTimeBeanPostProcessor implements BeanPostProcessor {
    
    @Override
    public Object postProcessBeforeInitialization(Object bean, String beanName) throws BeansException {
        if (bean instanceof Dog) {
            System.out.println("postProcessBeforeInitialization ...");
        }
        return bean;
    }
    
    @Override
    public Object postProcessAfterInitialization(Object bean, String beanName) throws BeansException {
        if (bean instanceof Dog) {
            System.out.println("postProcessAfterInitialization ...");
        }
        return bean;
    }
}

2.3.3 编写xml配置文件

在三种初始化方式都需要的时候,就不能直接声明 @Component 来注册 bean 了,只能通过配置类 / 配置文件的方式来实现。之前在 13 章我们使用了注解配置类的方式注册,这次我们换用 xml 配置文件:

<?xml version="1.0" encoding="UTF-8"?>
<beans xmlns="http://www.springframework.org/schema/beans"
       xmlns:xsi="http://www.w3.org/2001/XMLSchema-instance"
       xmlns:context="http://www.springframework.org/schema/context"
       xsi:schemaLocation="http://www.springframework.org/schema/beans http://www.springframework.org/schema/beans/spring-beans.xsd http://www.springframework.org/schema/context https://www.springframework.org/schema/context/spring-context.xsd">

    <bean id="dog" class="com.linkedbear.spring.postprocessor.c_executetime.bean.Dog" init-method="initMethod"/>

    <bean class="com.linkedbear.spring.postprocessor.c_executetime.config.ExecuteTimeBeanPostProcessor"/>

    <!-- 记得开注解配置,否则@PostConstruct不生效 -->
    <context:annotation-config/>
</beans>

2.3.4 测试运行

既然用了 xml 配置文件,那就不要再用注解驱动的 IOC 容器啦,要换用 ClassPathXmlApplicationContext 了:

public class BeanPostProcessorExecuteTimeApplication {
    
    public static void main(String[] args) throws Exception {
        ClassPathXmlApplicationContext ctx = new ClassPathXmlApplicationContext(
                "postprocessor/processor-executetime.xml");
        ctx.close();
    }
}

操作是一样的,初始化好就不用管了,直接关闭就好。

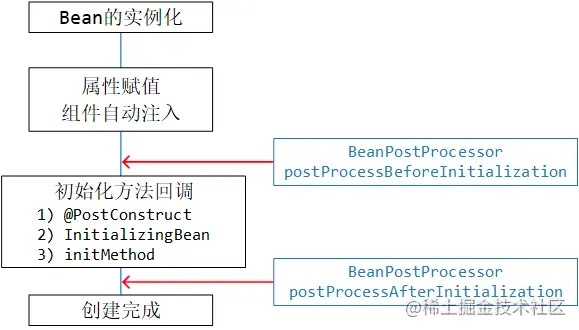
运行 main 方法,控制台打印如下信息:

postProcessBeforeInitialization ...
PostConstruct ...
InitializingBean ...
initMethod ...
postProcessAfterInitialization ...

由此可以总结出 bean 的初始化阶段的全流程:**BeanPostProcessor#postProcessBeforeInitialization** **@PostConstruct** **InitializingBean** **init-method** **BeanPostProcessor#postProcessAfterInitialization**

也就是下图所示:
2.4 FactoryBean的影响

对于那些 FactoryBean ,我们都是只拿它里面创建的真实对象,不要 FactoryBean 本身的,这种情况 BeanPostProcessor 能一起考虑进去吗?我们也来试一下。

2.4.1 声明Bean+FactoryBean

这次我们搞一个比较符合场景的写法:母鸡下蛋,让 Hen 去生产 Egg

public class Egg {
    
}

@Component
public class Hen implements FactoryBean<Egg> {
    
    @Override
    public Egg getObject() throws Exception {
        return new Egg();
    }
    
    @Override
    public Class<Egg> getObjectType() {
        return Egg.class;
    }
}

这样只把母鸡塞进 IOC 容器,我们就可以得到鸡蛋了。

2.4.2 编写后置处理器

后置处理器里面不打算搞花里胡哨的操作了,只打印 bean 的初始化拦截触发就好啦:

@Component
public class FactoryBeanPostProcessor implements BeanPostProcessor {
    
    @Override
    public Object postProcessBeforeInitialization(Object bean, String beanName) throws BeansException {
        System.out.println("拦截到Bean的初始化之前:" + bean);
        return bean;
    }
    
    @Override
    public Object postProcessAfterInitialization(Object bean, String beanName) throws BeansException {
        System.out.println("拦截到Bean的初始化之后:" + bean);
        return bean;
    }
}

2.4.3 测试运行

与前面一样,只初始化 IOC 容器,不干别的事:

public class FactoryBeanPostProcessorApplication {
    
    public static void main(String[] args) throws Exception {
        AnnotationConfigApplicationContext ctx = new AnnotationConfigApplicationContext(
                "com.linkedbear.spring.postprocessor.d_factorybean");
        ctx.close();
    }
}

运行 main 方法,发现控制台只打印了 Hen 的拦截:

拦截到Bean的初始化之前:com.linkedbear.spring.postprocessor.d_factorybean.bean.Hen@12cdcf4
拦截到Bean的初始化之后:com.linkedbear.spring.postprocessor.d_factorybean.bean.Hen@12cdcf4

咦?为什么没有 Egg 的初始化触发呢?(短暂的思考一下~)

因为**FactoryBean** 的生命周期与 IOC 容器一致,而 **FactoryBean** 生产 bean 的时机是延迟创建的

2.4.4 修改测试

既然没产出来,那我们就手动 get 一下吧:

public static void main(String[] args) throws Exception {
    AnnotationConfigApplicationContext ctx = new AnnotationConfigApplicationContext(
        "com.linkedbear.spring.postprocessor.d_factorybean");
    Egg egg = ctx.getBean(Egg.class);
    System.out.println(egg);
}

重新运行 main 方法,这次控制台打印出来了:

拦截到Bean的初始化之前:com.linkedbear.spring.postprocessor.d_factorybean.bean.Hen@12cdcf4
拦截到Bean的初始化之后:com.linkedbear.spring.postprocessor.d_factorybean.bean.Hen@12cdcf4
拦截到Bean的初始化之后:com.linkedbear.spring.postprocessor.d_factorybean.bean.Egg@a74868d
com.linkedbear.spring.postprocessor.d_factorybean.bean.Egg@a74868d

注意哦,这里只打印了初始化之后,并没有初始化之前的动作,这也就回应了上面 BeanPostProcessor 的 javadoc 内容。

/**
	 * Apply this {@code BeanPostProcessor} to the given new bean instance <i>after</i> any bean
	 * initialization callbacks (like InitializingBean's {@code afterPropertiesSet}
	 * or a custom init-method). The bean will already be populated with property values.
	 * The returned bean instance may be a wrapper around the original.
	 * <p>In case of a FactoryBean, this callback will be invoked for both the FactoryBean
	 * instance and the objects created by the FactoryBean (as of Spring 2.0). The
	 * post-processor can decide whether to apply to either the FactoryBean or created
	 * objects or both through corresponding {@code bean instanceof FactoryBean} checks.
	 * <p>This callback will also be invoked after a short-circuiting triggered by a
	 * {@link InstantiationAwareBeanPostProcessor#postProcessBeforeInstantiation} method,
	 * in contrast to all other {@code BeanPostProcessor} callbacks.
	 * <p>The default implementation returns the given {@code bean} as-is.
	 * @param bean the new bean instance
	 * @param beanName the name of the bean
	 * @return the bean instance to use, either the original or a wrapped one;
	 * if {@code null}, no subsequent BeanPostProcessors will be invoked
	 * @throws org.springframework.beans.BeansException in case of errors
	 * @see org.springframework.beans.factory.InitializingBean#afterPropertiesSet
	 * @see org.springframework.beans.factory.FactoryBean
	 */
	@Nullable
	default Object postProcessAfterInitialization(Object bean, String beanName) throws BeansException {
		return bean;
	}

3. BeanPostProcessor的扩展

借助 IDEA ,发现 BeanPostProcessor 有如下的接口扩展:

3.1 InstantiationAwareBeanPostProcessor

从类名上看,它与实例化有关系,而且它又带着一个 aware ,难道是在暗示我们又跟回调注入什么的相关吗?还是先看下文档注释吧。

3.1.1 javadoc理解

Subinterface of BeanPostProcessor that adds a before- instantiation callback , and a callback after instantiation but before explicit properties are set or autowiring occurs. Typically used to suppress default instantiation for specific target beans, for example to create proxies with special TargetSources (pooling targets, lazily initializing targets, etc), or to implement additional injection strategies such as field injection. NOTE: This interface is a special purpose interface, mainly for internal use within the framework. It is recommended to implement the plain BeanPostProcessor interface as far as possible, or to derive from InstantiationAwareBeanPostProcessorAdapter in order to be shielded from extensions to this interface.

BeanPostProcessor 的子接口,它添加了实例化之前的回调,以及在实例化之后但在设置显式属性或自动装配发生之前的回调。 通常用于抑制特定目标 bean 的默认实例化,例如创建具有特殊 TargetSource 的代理(池目标,延迟初始化目标等),或实现其他注入策略,例如字段注入。 注意:此接口是专用接口,主要供框架内部使用。建议尽可能实现普通的 BeanPostProcessor 接口,或从 InstantiationAwareBeanPostProcessorAdapter 派生,以免对该接口进行扩展。

文档注释已经写得很明白了,它的作用有两个:

  • 拦截并替换 Bean 的默认实例化动作。

  • 拦截 Bean 的属性注入和自动装配,并在此之前扩展。

所以,我们是不是可以先试着猜想一波,它对 bean 的生命周期的干预应该是在这两个时机:
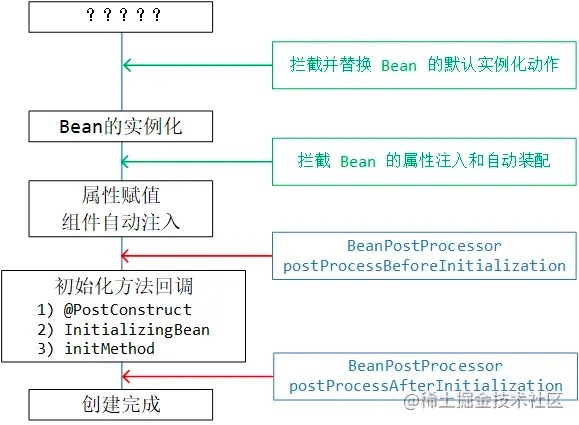
是不是真的这样,咱来看看 InstantiationAwareBeanPostProcessor 中定义了什么方法,从中获取信息来检验猜想是否正确。

3.1.2 接口方法定义

InstantiationAwareBeanPostProcessor 中定义了 4 个方法( 5.1 之前是 3 个):

default Object postProcessBeforeInstantiation(Class<?> beanClass, String beanName) throws BeansException {
    return null;
}

default boolean postProcessAfterInstantiation(Object bean, String beanName) throws BeansException {
    return true;
}

default PropertyValues postProcessProperties(PropertyValues pvs, Object bean, String beanName)
        throws BeansException {
    return null;
}

// 已过时,被上面的方法代替
@Deprecated
default PropertyValues postProcessPropertyValues(
        PropertyValues pvs, PropertyDescriptor[] pds, Object bean, String beanName) throws BeansException {
    return pvs;
}

分别看这三个方法,它们的作用分别是:

postProcessBeforeInstantiation:在 bean 的实例化之前处理

  • 非常容易理解,它可以拦截 bean 原本的实例化方法,转为用这里的实例化

postProcessAfterInstantiation:在 bean 的实例化之后处理

  • 这个方法比较奇怪,返回值是 boolean ,它有代表什么意思吗?

  • 其实,它与下面的 postProcessProperties 方法有关,如果返回 false ,则 postProcessProperties 方法不会执行。

postProcessProperties:在设置属性时处理 ???(好像不大对劲)

  • 根据 javadoc 得知,这个方法是在属性赋值之前触发的,而 PropertyValues 又是一组 field - value 的键值对

  • 由此可以断定,postProcessProperties 方法最终会返回一组属性和值的 PropertyValues ,让它参与 bean 的属性赋值环节

看来与上面一开始的猜想大差不离,那加入 InstantiationAwareBeanPostProcessor 后的 bean 的生命周期就是这样子咯:
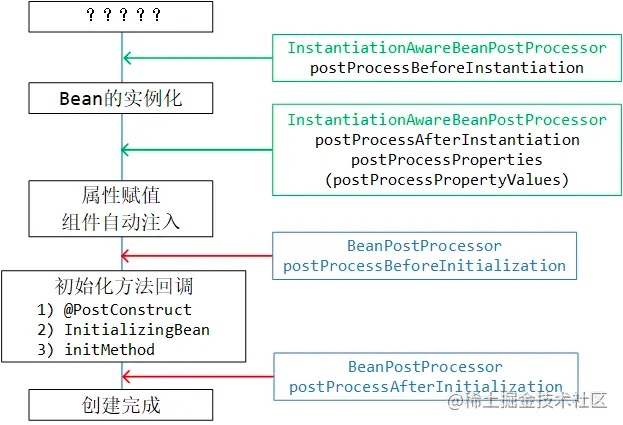
具体的操作,我们可以写几个 Demo 来验证一下,顺便体会一下 InstantiationAwareBeanPostProcessor 对 bean 的扩展。

3.1.3 InstantiationAwareBeanPostProcessor拦截bean创建

先来试一下第一个 postProcessBeforeInstantiation 方法吧,既然它能直接拦截 bean 的创建,那正常的 bean 里头的东西,或许被它一拦截,就没了吧。

3.1.3.1 声明bean

这次我们来玩个球,给球声明一个 id 的属性就够了:(不要忘记写 toString 方法,方便打印查看)

public class Ball {
    
    private String id;
    
    public String getId() {
        return id;
    }
    
    public void setId(String id) {
        this.id = id;
    }
    
    @Override
    public String toString() {
        return "Ball{" + "id='" + id + '\'' + '}';
    }
}

3.1.3.2 编写后置处理器

既然是拦截创建,那我就希望,能在后置处理器中单独创建一个球,不要配置声明的。于是后置处理器就可以这样编写:

public class BallFactoryInstantiationProcessor implements InstantiationAwareBeanPostProcessor {
    
    @Override
    public Object postProcessBeforeInstantiation(Class<?> beanClass, String beanName) throws BeansException {
        if ("ball".equals(beanName)) {
            // 返回非null,代表拦截创建
            Ball ball = new Ball();
            ball.setId("工厂球~");
            return ball;
        }
        // 默认直接返回null,代表不拦截
        return null;
    }
}

这里我在 postProcessBeforeInstantiation 中显式的 new 了一个球,这样回头如果真的走了这个分支,那将返回后置处理器创建的球。

3.1.3.3 编写xml配置文件

xml 配置文件中,要声明一个 Ball 的 bean ,同时把后置处理器也注册进去:

<?xml version="1.0" encoding="UTF-8"?>
<beans xmlns="http://www.springframework.org/schema/beans"
       xmlns:xsi="http://www.w3.org/2001/XMLSchema-instance"
       xsi:schemaLocation="http://www.springframework.org/schema/beans http://www.springframework.org/schema/beans/spring-beans.xsd">

    <bean id="ball" class="com.linkedbear.spring.postprocessor.e_instantiation.bean.Ball">
        <property name="id" value="123456"/>
    </bean>
    
    <bean class="com.linkedbear.spring.postprocessor.e_instantiation.config.BallFactoryInstantiationProcessor"/>
</beans>

3.1.3.4 测试运行

好了,可以编写测试类来检验效果了,使用 xml 配置文件来驱动 IOC 容器:

public class InstantiationAwareApplication {
    
    public static void main(String[] args) throws Exception {
        ClassPathXmlApplicationContext ctx = new ClassPathXmlApplicationContext(
                "postprocessor/processor-instantiation.xml");
        Ball ball = (Ball) ctx.getBean("ball");
        System.out.println(ball);
    }
}

运行 main 方法,控制台打印的是 “工厂球” ,证明 BallFactoryInstantiationProcessor 已经成功拦截了 xml 配置文件中声明的 Ball 的创建,转而使用后置处理器的逻辑创建了。

Ball{id='工厂球~'}

3.1.4 InstantiationAwareBeanPostProcessor给bean做属性赋值

继续顺延上面的 Demo ,我们来试试如果不给 bean 的属性赋值,交由 InstantiationAwareBeanPostProcessor 来做,它真的能做到吗?

3.1.4.1 扩展xml配置文件

再声明一个 Ball ,这次只创建对象,不给 id 赋值:

<bean id="ball2" class="com.linkedbear.spring.postprocessor.e_instantiation.bean.Ball"/>

3.1.4.2 扩展BallFactoryInstantiationProcessor

这次要做属性赋值了,对应的接口方法是 postProcessProperties ,我们来重写它:

    @Override
    public PropertyValues postProcessProperties(PropertyValues pvs, Object bean, String beanName)
            throws BeansException {
        if ("ball2".equals(beanName)) {
            MutablePropertyValues values = new MutablePropertyValues(pvs);
            values.addPropertyValue("id", "拦截球~");
            return values;
        }
        return null;
    }

由于 PropertyValues 设计为接口且只暴露可读方法,此处选用实现类重新包装并添加 id 属性(强转也可以,但此种写法更稳妥)

3.1.4.3 测试运行

修改测试代码,添加 ball2 的获取,并打印出来:

		public static void main(String[] args) throws Exception {
        ClassPathXmlApplicationContext ctx = new ClassPathXmlApplicationContext(
                "postprocessor/processor-instantiation.xml");
        Ball ball = (Ball) ctx.getBean("ball");
        System.out.println(ball);
        
        Ball ball2 = (Ball) ctx.getBean("ball2");
        System.out.println(ball2);
    }

重新运行 main 方法,控制台打印出了 “拦截球” ,证明 postProcessProperties 方法的确能给 bean 注入属性。

Ball{id='工厂球~'}
Ball{id='拦截球~'}

3.1.4.4 postProcessProperties不会影响postProcessBeforeInstantiation

突然意识到一个伏笔是吧,前面编写后置处理器的时候,一直都是拿 bean 的 name 做匹配。如果在 postProcessBeforeInstantiation 方法中,我们把判断条件改为所有 Ball 都拦截,那效果会怎么样呢?

@Override
    public Object postProcessBeforeInstantiation(Class<?> beanClass, String beanName) throws BeansException {
        if (Ball.class.equals(beanClass)) {
            Ball ball = new Ball();
            ball.setId("工厂球~");
            return ball;
        }
        return null;
    }

修改为上述代码后,重新运行 main 方法,控制台打印了两个工厂球:

Ball{id='工厂球~'}
Ball{id='工厂球~'}

说明 postProcessBeforeInstantiation 方法执行完毕后,并不会再执行 postProcessProperties (换句话说,postProcessProperties 方法没有机会能再影响 postProcessBeforeInstantiation 方法创建出来的对象)

3.1.5 postProcessAfterInstantiation的作用

上面的分析中我们也说了,postProcessAfterInstantiation 方法如果返回 false ,则 postProcessProperties 方法就不会执行,下面简单验证一下。

BallFactoryInstantiationProcessor 中加入 postProcessAfterInstantiation 方法的重写:

@Override
public boolean postProcessAfterInstantiation(Object bean, String beanName) throws BeansException {
    return false;
}

重新运行 main 方法,发现 ball2 已经没有 id 了:

Ball{id='工厂球~'}
Ball{id='null'}

3.2 SmartInstantiationAwareBeanPostProcessor

相较于 InstantiationAwareBeanPostProcessor 只多了一个 smart ,意思是它更聪明咯?还真是,这个接口扩展了 3 个额外的方法,而且每个方法还都挺有用的,我们可以来简单的看看。

default Class<?> predictBeanType(Class<?> beanClass, String beanName) throws BeansException {
    return null;
}

default Constructor<?>[] determineCandidateConstructors(Class<?> beanClass, String beanName) throws BeansException {
    return null;
}

default Object getEarlyBeanReference(Object bean, String beanName) throws BeansException {
    return bean;
}
  • predictBeanType :预测 bean 的类型(不能预测时返回 null )

  • determineCandidateConstructors:根据 bean 对应 Class 中的构造器定义,决定使用哪个构造器进行对象实例化

    • 这个方法很重要,如果 bean 没有声明任何构造器,则此处会拿到默认的无参构造器;如果声明了多个构造器,则该处会根据 IOC 容器中的 bean 和指定的策略,选择最适合的构造器

  • getEarlyBeanReference :提早暴露出 bean 的对象引用(该方法与 bean 的循环依赖解决有关,在 SpringBoot 的小册 15 章有讲)

看着这么高大上,但是讲真,这个接口在现阶段不是很好演示,而且它本身属于 SpringFramework 内部的接口,通常我们根本用不到,所以这个小伙伴们知道下就可以了,不要在这上面耗费太多的时间和精力。

到后面 IOC 原理中,bean 的完整生命周期会涉及 SmartInstantiationAwareBeanPostProcessor 的,小伙伴们可以到时候留意一下。

3.3 DestructionAwareBeanPostProcessor

顾名思义,它可以在 bean 的销毁前拦截处理。这个接口的方法定义也很简单:

void postProcessBeforeDestruction(Object bean, String beanName) throws BeansException;

default boolean requiresDestruction(Object bean) {
    return true;
}

很明显它就是一个回调的处理而已,没什么花里胡哨的。

下面我们还是来简单的演示一下它的使用。

3.3.1 DestructionAwareBeanPostProcessor的使用

3.3.1.1 声明Bean

在这个 Demo 中我们只需要它的销毁方法:(此处只声明了 @PreDestroyDisposableBean

public class Pen implements DisposableBean {
    
    private Integer ink = 100;
    
    @PreDestroy
    public void outwellInk() {
        System.out.println("Pen @PreDestroy 钢笔中的墨水都放干净了。。。");
    }
    
    @Override
    public void destroy() throws Exception {
        System.out.println("Pen DisposableBean 写完字了。。。");
    }
    
    // getter setter
}

3.3.1.2 编写后置处理器

既然是在 bean 的销毁阶段回调,那我们可以在这里针对 Pen 给它放干墨水(模拟操作):

@Component
public class DestructionPenPostProcessor implements DestructionAwareBeanPostProcessor {
    
    @Override
    public void postProcessBeforeDestruction(Object bean, String beanName) throws BeansException {
        if (bean instanceof Pen) {
            System.out.println("DestructionPenPostProcessor postProcessBeforeDestruction run ......");
            Pen pen = (Pen) bean;
            pen.setInk(0);
        }
    }
}

3.3.1.3 测试运行

编写测试代码,直接包扫描,驱动 IOC 容器。驱动完成后啥也不用干,直接销毁 IOC 容器就可以:

public class DestructionPostProcessorApplication {
    
    public static void main(String[] args) throws Exception {
        AnnotationConfigApplicationContext ctx = new AnnotationConfigApplicationContext(
                "com.linkedbear.spring.postprocessor.f_destruction");
        ctx.close();
    }
}

运行 main 方法,控制台打印如下信息:

DestructionPenPostProcessor postProcessBeforeDestruction run ......
@PreDestroy - 钢笔中的墨水都放干净了。。。
Pen DisposableBean 写完字了。。。

由此可以体会到 DestructionAwareBeanPostProcessor 的使用。

3.3.2 Spring中的DestructionAwareBeanPostProcessor

关于这个接口的使用,在 SpringFramework 中有个蛮经典的:监听器的引用释放回调。由于 ApplicationContext 中会注册一些 ApplicationListener ,而这些 ApplicationListenerApplicationContext 互相引用,所以在 IOC 容器销毁之前,就需要将这些引用断开,这样才可以进行对象的销毁和回收。

3.4 MergedBeanDefinitionPostProcessor

BeanDefinition 合并的过程,在后置处理器中也有对应的拦截处理。

3.4.1 回顾BeanDefinition的合并

回想一下,BeanDefinition 合并的意义是啥来着?是为了将父 bean 继承或者已经定义好的注入属性一块拿过来,这样就不用子 bean 再定义一次了吧!这种合并是一种情况,不过还有一种情况,它发生在基于注解的类继承上:

public abstract class Animal {

    @Autowired
    private Person person;
}
public class Cat extends Animal {
    
    private String name;
}

这种情况下,向 IOC 容器注册 Cat 时,Spring 在底层也会把 person 需要注入的定义信息合并进去,并标注它需要自动注入处理。

3.4.2 接口方法定义

再来看 MergedBeanDefinitionPostProcessor 的接口,它只定义了一个方法:

void postProcessMergedBeanDefinition(RootBeanDefinition beanDefinition, Class<?> beanType, String beanName);

( 5.1 后又定义了一个 resetBeanDefinition 方法,仅用于清除 BeanFactory 内部缓存,此处不对此展开)

这个方法的 javadoc 出奇的少,甚至都没给什么有用的信息,那这咋研究呢?得了,我们写个 Demo 测一下吧。

3.4.3 MergedBeanDefinitionPostProcessor的使用

为了还原出 BeanDefinition 的合并,这里把上面举的例拿过来测试用吧。

3.4.3.1 声明bean

声明的 bean 就是上面的一个 Animal ,一个 Cat ,当然还得有 Person

public abstract class Animal {
    
    @Autowired
    private Person person;
    
    public Person getPerson() {
        return person;
    }
    
    public void setPerson(Person person) {
        this.person = person;
    }
}
@Component
public class Cat extends Animal {
    
    @Value("咪咪")
    private String name;
    
    @Override
    public String toString() {
        return "Cat {person: " + this.getPerson() + ", name: " + name + "}";
    }
}
@Component
public class Person {
    
}

3.4.3.2 编写后置处理器

后置处理器里面不用写什么花里胡哨的结构,先拦截一下就好:

@Component
public class MergeDefinitionPostProcessor implements MergedBeanDefinitionPostProcessor {
    
    @Override
    public void postProcessMergedBeanDefinition(RootBeanDefinition beanDefinition, Class<?> beanType, String beanName) {
        if (Cat.class.equals(beanType)) {
            System.out.println("MergeDefinitionPostProcessor postProcessMergedBeanDefinition run......");
            System.out.println(beanDefinition);
        }
    }
}

此处稍微停一下,思考一下此处 postProcessMergedBeanDefinition 的参数列表中为什么只有 beanDefinition 和 beanType ?难道 bean 还没有创建吗?

3.4.3.3 测试运行

测试的代码也很简单,还是直接使用注解 IOC 容器扫描包即可:

public class MergeDefinitionPostProcessorApplication {
    
    public static void main(String[] args) throws Exception {
        AnnotationConfigApplicationContext ctx = new AnnotationConfigApplicationContext(
                "com.linkedbear.spring.postprocessor.g_mergedefinition");
        ctx.close();
    }
}

运行 main 方法,控制台有打印 CatBeanDefinition 信息,说明确实拦截到 Cat 的定义信息合并了。

可是上面的问题呢?此时 bean 被创建了吗?

3.4.3.4 给Cat添加无参构造器

重写 Cat 的无参构造器,让它在控制台打印一句话:

@Component
public class Cat extends Animal {
    
    public Cat() {
        System.out.println("Cat constructor run ......");
    }

重新运行 main 方法,发现是先创建的 Cat 后打印的后置处理器执行:

Cat constructor run ......
MergeDefinitionPostProcessor postProcessMergedBeanDefinition run......

这个设计是为什么呢?既然创建出了 bean ,为什么后置处理器的回调中没有把 bean 传给我们呢?

3.4.3.5 调整Animal的自动注入位置

问题思考不出来没关系,我们来调整一点代码,让 Animal 中的 person 使用 setter 的自动注入,并在控制台打印一句话:

    @Autowired
    public void setPerson(Person person) {
        System.out.println("Animal setPerson run ......");
        this.person = person;
    }

再次运行 main 方法,发现 setter 方法的自动注入在最后才打印:

Cat constructor run ......
MergeDefinitionPostProcessor postProcessMergedBeanDefinition run......
Animal setPerson run ......

由此可以得出结论了吧:postProcessMergedBeanDefinition 方法发生在 bean 的实例化之后,自动注入之前。而这个设计,就是为了在属性赋值和自动注入之前,把要注入的属性都收集好,这样才能顺利的向下执行注入的逻辑。

而实例化好的 bean 没有传入接口中的原因,其实也很好解释:人家是合并 **BeanDefinition** 的,跟 bean 的实例有什么关系呢最少知道原则)?

3.4.4 Spring中的MergeDefinitionPostProcessor

在 SpringFramework 中,一个非常重要的 MergeDefinitionPostProcessor 的实现,就是 AutowiredAnnotationBeanPostProcessor ,它负责给 bean 实现注解的自动注入,而注入的依据就是 postProcessMergedBeanDefinition 后整理的标记(这个标记会在 IOC 原理的 bean 完整生命周期中提及)。

当然,通常 MergedBeanDefinitionPostProcessor 这个后置处理器也不会在开发中使用,仅仅用于 SpringFramework 的内部,小伙伴们知道下就好,不要在这上面耗费太长时间和精力。

最后更新于